ASP.NET Core First Query with Couchbase SDK 3
- Use the Couchbase C# SDK in an ASP.NET Core application
- Learn how to create new database records in Couchbase and look them up via a REST API
- Get a brief introduction to SQL++ (N1QL) queries with Couchbase
Prerequisite: Run Couchbase Server
- Couchbase Server 6.5 (or greater) is already running.
- An empty bucket named "default" has been created.
- Both a primary index and an adaptive index have been created and built on the default bucket.
- If you still need to perform these tasks please use the following:
10-minute Couchbase Docker Container Configuration
- Visual Studio is installed. This tutorial uses Visual Studio 2019 16.7
- A .NET Core Runtime is installed. This tutorial uses .NET Core 3.1
- A tool to make HTTP requests (e.g. cURL or Postman).
Step 1: Start a New Project in Visual Studio
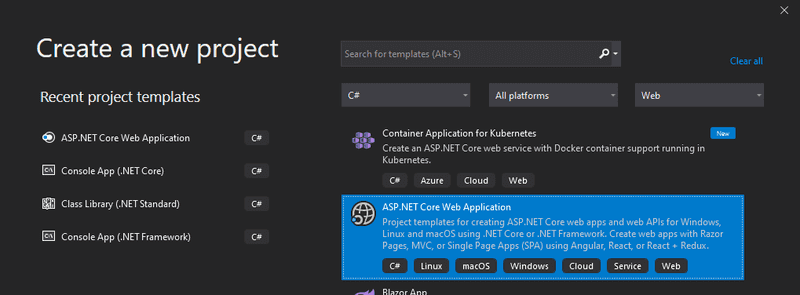
Open Visual Studio 2019 and create a new ASP.NET Core Web Application project.
Name the project, "QuickStart".
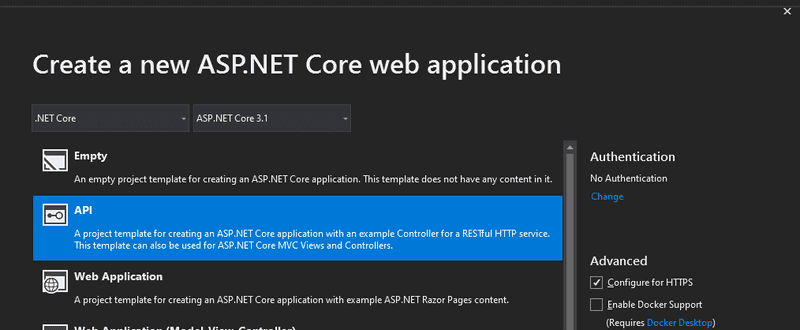
Select the API template.
Install the latest Couchbase.Extensions.DependencyInjection package from NuGet. This will install both the Couchbase .NET SDK and a Dependency Injection extension for ASP.NET Core.
You can do this via Visual Studio's Package Manager Console like so:
Install-Package Couchbase.Extensions.DependencyInjectionNOTE: Alternatively, you can use the NuGet UI by right-clicking "Dependencies" in Solution Explore and then "Manage NuGet Packages".
Step 2: ASP.NET Core Configuration
There are two steps to configure your new ASP.NET Core application.
First, add a "Couchbase" section to the appsettings.json file. If you've followed along with the Couchbase Docker Container Configuration, then edit your appsettings.json file to add a Couchbase section as follows:
{
  "Logging": {
    "LogLevel": {
      "Default": "Information",
      "Microsoft": "Warning",
      "Microsoft.Hosting.Lifetime": "Information"
    }
  },
  "AllowedHosts": "*",
  "Couchbase": {
    "ConnectionString" : "couchbase://localhost" ,
    "Username": "Administrator",
    "Password": "password"
  }
}
The next step is to setup Couchbase in Startup.cs.
To do this, first add services.AddCouchbase(Configuration.GetSection("Couchbase")); to the ConfigureServices method. Make sure to close the connection as well. You can do this in the Configure method by adding an IHostApplicationLifetime parameter. Here is the complete Startup.cs:
using Couchbase.Extensions.DependencyInjection;
using Microsoft.AspNetCore.Builder;
using Microsoft.AspNetCore.Hosting;
using Microsoft.Extensions.Configuration;
using Microsoft.Extensions.DependencyInjection;
using Microsoft.Extensions.Hosting;

namespace QuickStart
{
    public class Startup
    {
        public Startup(IConfiguration configuration)
        {
            Configuration = configuration;
        }

        public IConfiguration Configuration { get; }

        // This method gets called by the runtime. Use this method to add services to the container.
        public void ConfigureServices(IServiceCollection services)
        {
            services.AddControllers();

            services.AddCouchbase(Configuration.GetSection("Couchbase")); // (1)
        }

        // This method gets called by the runtime. Use this method to configure the HTTP request pipeline.
        public void Configure(IApplicationBuilder app, IWebHostEnvironment env, IHostApplicationLifetime appLifetime)
        {
            if (env.IsDevelopment())
            {
                app.UseDeveloperExceptionPage();
            }

            app.UseHttpsRedirection();

            app.UseRouting();

            app.UseAuthorization();

            app.UseEndpoints(endpoints =>
            {
                endpoints.MapControllers();
            });

            appLifetime.ApplicationStopped.Register(() => // (2)
            {
                app.ApplicationServices.GetRequiredService<ICouchbaseLifetimeService>().Close();
            });
        }
    }
}- Add Couchbase service to ASP.NET Core
- Dispose of Couchbase on ASP.NET Core shutdown
At this point, your ASP.NET Core application is now configured to use Couchbase.
Step 3: Create new documents
Start by creating a simple "model" class to represent a user. (Right Click on the project -> Add New Item -> Class -> User.cs)
public class User
{
    public string FirstName { get; set; }
    public string LastName { get; set; }
    public string Email { get; set; }
    public string TagLine { get; set; }
    public string Type => "User";
}
Let's create two controller actions. These will correspond to two API endpoints: one will create a document and one will query a document.
Replace the WeatherForecastController with a UserController (make sure that UserController still has the [ApiController] attribute).
NOTE: WeatherForecastController is a class that's created by the Visual Studio API template. If you aren't using that template or WeatherForecastController isn't in your code, you can just create a new UserController class that inherits from ControllerBase.
The complete source code available on GitHub
Create a constructor in that controller which has both IBucketProvider and IClusterProvider parameters. (These will be automatically injected thanks to the AddCouchbase added earlier to Startup.cs). You may not always need both, depending on what your controller is going to do. For this example, we need both.
private readonly IClusterProvider _clusterProvider;
private readonly IBucketProvider _bucketProvider;

public UserController(IClusterProvider clusterProvider, IBucketProvider bucketProvider)
{
    _clusterProvider = clusterProvider;
    _bucketProvider = bucketProvider;
}
These providers can be used to retrieve cluster or bucket objects. A bucket object can be used to get a collection. Buckets may contain multiple collections, but will always have a default collection. Use a collection object to insert plain C# objects into Couchbase. They will be serialized into JSON and stored with a key: collection.InsertAsync(key, user);. Create an asynchronous InsertData POST method in UserController like so:
[HttpPost]
[Route("/")]
public async Task<string> InsertUser(User user)
{
    var bucket = await _bucketProvider.GetBucketAsync("default");
    var collection = bucket.DefaultCollection();

    var key = Guid.NewGuid().ToString();
    await collection.InsertAsync(key, user);
    return "Inserted user with ID: " + key;
}
Compile and run your ASP.NET Core program locally with CTRL+F5. Use cURL or Postman or the HTTP tool of your choice to create three POSTs with JSON content to the specified route. The body of the posts should look something like these:
// first POST
{
    "firstName" : "Major",
    "lastName" : "Tom",
    "email" : "major.tom@acme.com",
    "tagLine" : "Send me up a drink"
}

// second POST
{
    "email": "perry.mason@acme.com",
    "firstName": "Perry",
    "lastName": "Mason",
    "tagLine": "Who can we get on the case?"
}

// third POST
{
    "email": "jerry.wasaracecardriver@acme.com",
    "firstName": "Jerry",
    "lastName": "Wasaracecardriver",
    "tagLine": "el sob number one"
}
An example of a cURL command using Powershell to make this request would be:
curl --location --request POST 'https://localhost:44316/' \
--header 'Content-Type: application/json' \
--data-raw '{
    "firstName" : "Major",
    "lastName" : "Tom",
    "email" : "major.tom@acme.com",
    "tagLine" : "Send me up a drink"
}'
NOTE: If you're using Postman, you can copy and paste the above cURL command into Postman. (File->Import->Paste Raw Text) Please make sure your port number matches what Visual Studio has set.
NOTE: The port number that Visual Studio generates for you will likely be different from 44316 in the above example
When the request is successful, the response will contain the generated ID:
Inserted user with ID: d28a19d4-0c37-447f-b0c0-66a7f2af3c97Now there are three documents in the default bucket. Next, let's query them back out.
Step 4: Query the documents
Open the Query Workbench in the Couchbase UI. Enter a query to select everything from the default bucket:
SELECT d.*
FROM default d
You should see the inserted documents in the results:
[
  {
    "email": "perry.mason@acme.com",
    "firstName": "Perry",
    "lastName": "Mason",
    "tagLine": "Who can we get on the case?",
    "type": "user"
  },
  {
    "email": "major.tom@acme.com",
    "firstName": "Major",
    "lastName": "Tom",
    "tagLine": "Send me up a drink",
    "type": "user"
  },
  {
    "email": "jerry.wasaracecardriver@acme.com",
    "firstName": "Jerry",
    "lastName": "Wasaracecardriver",
    "tagLine": "el sob number one",
    "type": "user"
  }
]
Next, create a second controller action called GetUserByEmail in UserController.cs. This will be for an API endpoint to retrieve documents, given an email address, using a query like:
SELECT d.*
FROM default d
WHERE d.email = "major.tom@acme.com"
To execute a query in .NET, we first need a cluster object from the cluster provider.
Next, create a query string with a named parameter for email: var n1ql = "SELECT d.* FROM default d WHERE d.email = $email";.
Finally, use the string with cluster.QueryAsync(...) to execute the query object. Parameters and other settings can be supplied using a QueryOptions object (shown as a lambda opt => opt... below):
[HttpGet]
[Route("/")]
public async Task<List<User>> GetUserByEmail(string email)
{
    var cluster = await _clusterProvider.GetClusterAsync();
    var n1ql = "SELECT d.* FROM default d WHERE d.email = $email";
    var result = await cluster.QueryAsync<User>(n1ql,
        opt =>
        {
            opt.Parameter("$email", email);
        });
    return await result.Rows.ToListAsync();
}
NOTE: result.Rows is of type IAsyncEnumerable. There are a number of extension methods you can use with this interface (include ToListAsync, as in the example). You can also useawait foreach to asynchronously stream the results, if your use case calls for it.
Compile and run your ASP.NET Core program locally with CTRL+F5. Use cURL or Postman or the HTTP tool of your choice to create a GET with a querystring variable of email with the specified email address. Example of a cURL request:
curl --location --request GET 'https://localhost:44316/?email=major.tom@acme.com'NOTE: Since this is a GET, you can make this request from a web browser instead.
The body of a successful response should look something like this:
[
    {
        "firstName" : "Major",
        "lastName" : "Tom",
        "email" : "major.tom@acme.com",
        "tagLine" : "Send me up a drink"
    }
]
Done
If you've written SQL before, the N1QL queries in this example should look familiar. Instead of querying a table, default is the name of a bucket.
This tutorial uses the Couchbase .NET SDK 3.x. This same quickstart is also available for Couchbase .NET SDK 2.x.
If you're looking to upgrade from the 2.x to the 3.x SDK, check out this guide for Migrating from SDK2 to SDK3 API.
Be sure to check out the other quick start exercises. The complete source code is available on GitHub

