Quickstart in Couchbase with Java and Spring Boot
- Learn to build a REST API in Java using Spring Boot and Couchbase
- Explore key-based operations and SQL++ querying using Spring Data Couchbase repositories
- Explore CRUD operations in action with Couchbase
Getting Started
Prerequisites
To run this prebuilt project, you will need:
- Couchbase Capella cluster with travel-sample bucket loaded.
- To run this tutorial using a self managed Couchbase cluster, please refer to the appendix.
- Java SDK 17 or higher installed
- Code Editor installed (IntelliJ IDEA, Eclipse, or Visual Studio Code)
- Maven command line
Source Code
git clone https://github.com/couchbase-examples/java-springboot-quickstart.gitInstall Dependencies
mvn packageNote: Maven automatically restores packages when building the project. in IntelliJ IDEA or Eclipse depending on IDE configuration.
Database Server Configuration
-
The
CouchbaseConfigclass is a Spring configuration class responsible for setting up the connection to a Couchbase database in a Spring Boot application. It defines two beans:-
getCouchbaseCluster(): This bean creates and configures a connection to the Couchbase cluster using the provided hostname, username, and password. -
getCouchbaseBucket(Cluster cluster): This bean retrieves a Couchbase bucket from a cluster, ensuring it exists and is ready within a timeout, throwing exceptions if not found or if connection times out.
-
Application Properties
You need to configure the connection details to your Couchbase Server in the application.properties file located in the src/main/resources directory.
In the connection string, replace DB_CONN_STR with the connection string of your Couchbase cluster. Replace DB_USERNAME and DB_PASSWORD with the username and password of a Couchbase user with access to the bucket.
The connection string should be in the following format:
spring.couchbase.bootstrap-hosts=couchbases://xyz.cloud.couchbase.com
OR
spring.couchbase.bootstrap-hosts=localhost
The couchbases protocol is used for secure connections.
spring.couchbase.bootstrap-hosts=DB_CONN_STR
spring.couchbase.bucket.user=DB_USERNAME
spring.couchbase.bucket.password=DB_PASSWORD
For more information on the spring boot connection string, see Common Application Properties.
Running The Application
Directly on the machine
At this point the application is ready, and you can run it via your IDE or from the terminal:
mvn spring-boot:run -e -XNote: Either the Couchbase Server must be installed and running on localhost or the connection string must be updated in the
application.propertiesfile.
Docker
Build the Docker image
docker build -t java-springboot-quickstart .Run the Docker image
docker run -d --name springboot-container -p 8080:8080 java-springboot-quickstart -e DB_CONN_STR=<connection_string> -e DB_USERNAME=<username> -e DB_PASSWORD=<password>Note: The application.properties file has the connection information to connect to your Capella cluster. You can also pass the connection information as environment variables to the Docker container.
If you choose not to pass the environment variables, you can update the application.properties file in the src/main/resources folder.
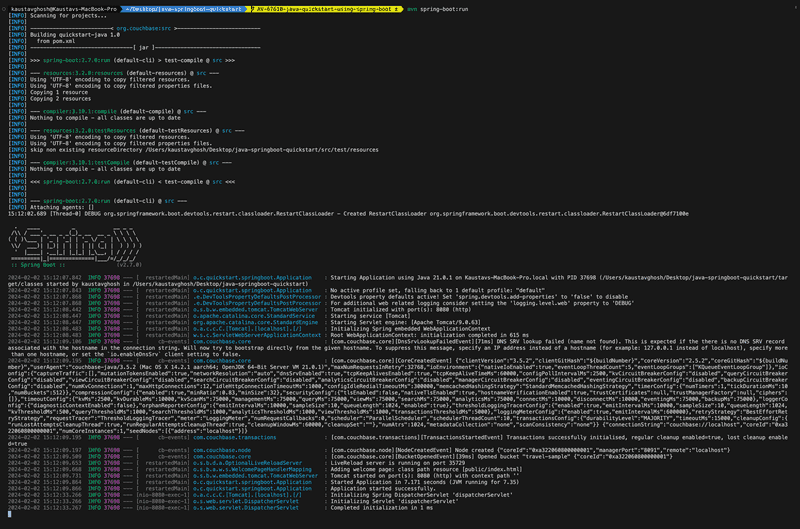
Once the application is running, you can see the logs in the console. You should see the following log message indicating that the application has started successfully:
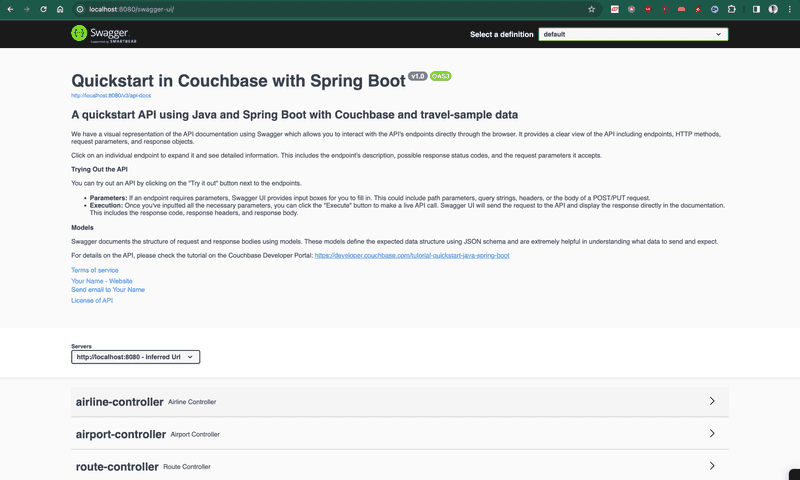
Once the site is up and running you can launch your browser and go to the Swagger Start Page to test the APIs.
Data Model
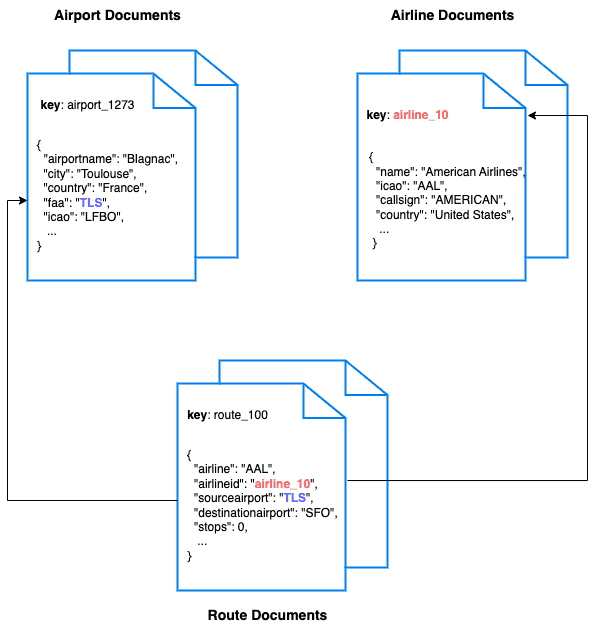
For this tutorial, we use three collections, airport, airline and route that contain sample airports, airlines and airline routes respectively. The route collection connects the airports and airlines as seen in the figure below. We use these connections in the quickstart to generate airports that are directly connected and airlines connecting to a destination airport. Note that these are just examples to highlight how you can use SQL++ queries to join the collections.
Airline Document Structure
We will be setting up a REST API to manage some airline documents. The name field is the name of the airline. The callsign field is the callsign of the airline. The iata field is the IATA code of the airline. The icao field is the ICAO code of the airline. The country field is the country of the airline.
Our airline document will have a structure similar to the following example:
{
  "name": "Couchbase Airways",
  "callsign": "Couchbase",
  "iata": "CB",
  "icao": "CBA",
  "country": "United States"
}
Let's Review the Code
To begin open the repository in an IDE of your choice to learn about how to create, read, update and delete documents in your Couchbase Server.
Code Organization
src/test/java: Contains integration tests.src/main/java/org/couchbase/quickstart/springboot/repositories: Contains the repository implementation.src/main/java/org/couchbase/quickstart/springboot/models: Contains the data model.src/main/java/org/couchbase/quickstart/springboot/controllers: Contains the RESTful API controllers.src/main/java/org/couchbase/quickstart/springboot/services: Contains the service classes.
Model
Airline.java
This class represents the data model for an airline. It contains fields such as ID, type, name, IATA code, ICAO code, callsign, and country. The class uses annotations for validation.
Controller
AirlineController.java
This class defines the RESTful API endpoints for managing airlines. It handles HTTP requests for creating, updating, deleting, and retrieving airlines. It also provides endpoints for listing airlines by various criteria.
An example of the pattern for the GET mapping is shown below.For the full code, see the AirlineController.java.
@RestController
@RequestMapping("/api/v1/airline")
@Slf4j
public class AirlineController {

   private final AirlineService airlineService;

    public AirlineController(AirlineService airlineService) {
        this.airlineService = airlineService;
    }

    // Error messages
    private static final String INTERNAL_SERVER_ERROR = "Internal Server Error";
    private static final String DOCUMENT_NOT_FOUND = "Document Not Found";

    @GetMapping("/{id}")
    @Operation(summary = "Get an airline by ID")
    @Description(value = "...")
    public ResponseEntity<Airline> getAirline(@PathVariable String id) {
        try {
            Airline airline = airlineService.getAirlineById(id);
            if (airline != null) {
                return new ResponseEntity<>(airline, HttpStatus.OK);
            } else {
                log.error(DOCUMENT_NOT_FOUND + ": " + id);
                return new ResponseEntity<>(HttpStatus.NOT_FOUND);
            }
        } catch (DocumentNotFoundException e) {
            log.error(DOCUMENT_NOT_FOUND + ": " + id);
            return new ResponseEntity<>(HttpStatus.NOT_FOUND);
        } catch (Exception e) {
            log.error(INTERNAL_SERVER_ERROR + ": " + e.getMessage());
            return new ResponseEntity<>(HttpStatus.INTERNAL_SERVER_ERROR);
        }
    }
}
Service
AirlineServiceImpl.java
This class implements the AirlineService interface. It acts as an intermediary between the controller and repository, providing business logic for managing airlines.
An example of the pattern for AirlineService is shown below. For the full code, see the AirlineServiceImpl.java.
public interface AirlineService {

    Airline getAirlineById(String id);

    ...
}

@Service
public class AirlineServiceImpl implements AirlineService {

    private final AirlineRepository airlineRepository;

    public AirlineServiceImpl(AirlineRepository airlineRepository) {
        this.airlineRepository = airlineRepository;
    }

    @Override
    public Airline getAirlineById(String id) {
        return airlineRepository.findById(id);
    }

    ...
}
Repository
AirlineRepositoryImpl.java
This class implements the AirlineRepository interface. It interacts with the Couchbase database to perform CRUD operations on airline documents. It uses the Couchbase Java SDK to execute queries and operations.
An example of the pattern for AirlineRepository is shown below. For the full code, see the AirlineRepositoryImpl.java.
public interface AirlineRepository {

    Airline findById(String id);

    ...
}

@Repository
public class AirlineRepositoryImpl implements AirlineRepository {

    private final Cluster cluster;
    private final Collection airlineCol;
    private final CouchbaseConfig couchbaseConfig;

    public AirlineRepositoryImpl(Cluster cluster, Bucket bucket, CouchbaseConfig couchbaseConfig) {
        this.cluster = cluster;
        this.airlineCol = bucket.scope("inventory").collection("airline");
        this.couchbaseConfig = couchbaseConfig;
    }

    @Override
    public Airline findById(String id) {
        return airlineCol.get(id).contentAs(Airline.class);
    }

    ...
}
Mapping Workflow
Mapping workflows describe how the HTTP methods (GET, POST, PUT, DELETE) interact with the AirlineService and the underlying database through the AirlineRepository to perform various operations on airline data.
A simple REST API using Spring Boot and the Couchbase SDK version 3.x with the following endpoints:
- Retrieve airlines by ID.
- Create new airlines with essential information.
- Update airline details.
- Delete airlines.
- List all airlines with pagination.
- List airlines by country and destination airport.
GET Mapping Workflow
@GetMapping("/{id}")
The GET mapping is triggered when a client sends an HTTP GET request to /api/v1/airline/{id} where {id} is the unique identifier of the airline.
- The
AirlineControllerreceives the request and extracts theidfrom the URL path. - It then calls the
getAirlineByIdmethod of theAirlineService, passing the extractedidas a parameter.This function internally calls get() to retrieve the airline from the database. - The
AirlineServiceinteracts with the database through theAirlineRepositoryto find the airline with the specifiedid. - If the airline is found, the
AirlineServicereturns it as a response. - The
AirlineControllerconstructs an HTTP response with a status code of 200 OK and includes the airline data in the response body as a JSON object. - The response is sent back to the client with the airline data if found, or a 404 Not Found response if the airline does not exist.
POST Mapping Workflow
@PostMapping("/{id}")
The POST mapping is triggered when a client sends an HTTP POST request to /api/v1/airline/{id}, where {id} is typically a unique identifier generated by the server (not provided by the client).
- The client includes the data of the new airline to be created in the request body as a JSON object.
- The
AirlineControllerreceives the request and extracts theidfrom the URL path, but thisidis not used for creating the airline; it's often generated by the server. - The
AirlineControllercalls thecreateAirlinemethod of theAirlineService, passing the airline data from the request body. This function internally calls airlineCol.insert() to insert the airline into the database. - The
AirlineServiceis responsible for creating a new airline and saving it to the database using theAirlineRepository. - If the airline is created successfully, the
AirlineServicereturns the newly created airline. - The
AirlineControllerconstructs an HTTP response with a status code of 201 Created and includes the created airline data in the response body as a JSON object. - The response is sent back to the client with the newly created airline data.
PUT Mapping Workflow
@PutMapping("/{id}")
The PUT mapping is triggered when a client sends an HTTP PUT request to /api/v1/airline/{id}, where {id} is the unique identifier of the airline to be updated.
- The client includes the updated data of the airline in the request body as a JSON object.
- The
AirlineControllerreceives the request, extracts theidfrom the URL path, and retrieves the updated airline data from the request body. - The
AirlineControllercalls theupdateAirlinemethod of theAirlineService, passing theidand updated airline data. This function internally calls airlineCol.replace() to replace the airline in the database. - The
AirlineServiceis responsible for updating the airline in the database using theAirlineRepository. - If the airline is updated successfully, the
AirlineServicereturns the updated airline. - The
AirlineControllerconstructs an HTTP response with a status code of 200 OK and includes the updated airline data in the response body as a JSON object. - The response is sent back to the client with the updated airline data if found, or a 404 Not Found response if the airline with the specified ID does not exist.
DELETE Mapping Workflow
@DeleteMapping("/{id}")
The DELETE mapping is triggered when a client sends an HTTP DELETE request to /api/v1/airline/{id}, where {id} is the unique identifier of the airline to be deleted.
- The
AirlineControllerreceives the request and extracts theidfrom the URL path. - The
AirlineControllercalls thedeleteAirlinemethod of theAirlineService, passing theidof the airline to be deleted. This function internally calls airlineCol.remove() to remove the airline from the database. - The
AirlineServiceis responsible for deleting the airline from the database using theAirlineRepository. - If the airline is deleted successfully, the
AirlineServiceperforms the deletion operation without returning any response data. - The
AirlineControllerconstructs an HTTP response with a status code of 204 No Content, indicating that the request was successful, but there is no content to return in the response body. - The response is sent back to the client to indicate the successful deletion of the airline.
These workflows illustrate how each HTTP method interacts with the AirlineService and the underlying database through the AirlineRepository to perform various operations on airline data.
Custom SQL++ Queries
1. Get all airlines by country
 @Override
    public List<Airline> findByCountry(String country, int limit, int offset) {
        String statement = "SELECT airline.id, airline.type, airline.name, airline.iata, airline.icao, airline.callsign, airline.country FROM `"
                + couchbaseConfig.getBucketName() + "`.`inventory`.`airline` WHERE country = $1 LIMIT $2 OFFSET $3";
        return cluster
                .query(statement,
                        QueryOptions.queryOptions().parameters(JsonArray.from(country, limit, offset))
                                .scanConsistency(QueryScanConsistency.REQUEST_PLUS))
                .rowsAs(Airline.class);
  }
In the above example, we are using the QueryOptions class to set the scanConsistency to REQUEST_PLUS to ensure that the query returns the latest data. We are also using the JsonObject class to set the country parameter in the query. For more information on query options and scan consistency, you can refer to the Query Options and Scan Consistency documentation.
Finally, we are using the rowsAs method to return the query results as a list of Airline objects.
In the query, we are using the country parameter to filter the results by country. We are also using the limit and offset parameters to limit the number of results returned and to implement pagination.
Once the query is executed, the AirlineController constructs an HTTP response with a status code of 200 OK and includes the list of airlines in the response body as a list of JSON objects.
2. Get all airlines by destination airport
 @Override
    public List<Airline> findByDestinationAirport(String destinationAirport, int limit, int offset) {
        String statement = "SELECT air.callsign, air.country, air.iata, air.icao, air.id, air.name, air.type " +
                "FROM (SELECT DISTINCT META(airline).id AS airlineId " +
                "      FROM `" + couchbaseConfig.getBucketName() + "`.`inventory`.`route` " +
                "      JOIN `" + couchbaseConfig.getBucketName() + "`.`inventory`.`airline` " +
                "      ON route.airlineid = META(airline).id " +
                "      WHERE route.destinationairport = $1) AS subquery " +
                "JOIN `" + couchbaseConfig.getBucketName() + "`.`inventory`.`airline` AS air " +
                "ON META(air).id = subquery.airlineId LIMIT $2 OFFSET $3";

        return ...
  }
In the query, we are using the destinationAirport parameter to filter the results by destination airport. We are also using the limit and offset parameters to limit the number of results returned and to implement pagination.
We are performing a JOIN operation between the route and airline documents to get the airlines that fly to the specified destination airport. We are using the META function to get the ID of the airline document.
Once the query is executed, the AirlineController constructs an HTTP response with a status code of 200 OK and includes the list of airlines in the response body as a list of JSON objects.
Running The Tests
This command will execute all the test cases in your project.
mvn testRun Individual Tests:
Additionally, you can run individual test classes or methods using the following commands:
To run the tests for the AirlineIntegrationTest class:
mvn test -Dtest=org.couchbase.quickstart.springboot.controllers.AirlineIntegrationTestTo run the tests for the AirportIntegrationTest class:
mvn test -Dtest=org.couchbase.quickstart.springboot.controllers.AirportIntegrationTestTo run the tests for the RouteIntegrationTest class:
mvn test -Dtest=org.couchbase.quickstart.springboot.controllers.RouteIntegrationTestProject Setup Notes
This project was based on the standard Spring Boot project.
A full list of packages are referenced in the pom.xml file.
Contributing
Contributions are welcome! If you'd like to contribute to this project, please fork the repository and create a pull request.
Appendix
Extending API by Adding New Entity
If you would like to add another entity to the APIs, these are the steps to follow:
- Create the new entity (collection) in the Couchbase bucket. You can create the collection using the SDK or via the Couchbase Server interface.
- Define the routes in a new class in the
controllerspackage similar to the existing routes likeAirportController.java. - Define the service in a new class in the
servicespackage similar to the existing services likeAirportService.java. - Define the repository in a new class in the
repositoriespackage similar to the existing repositories likeAirportRepository.java. - For integration tests, create a new class in the
controllerspackage similar to the existing tests likeAirportIntegrationTest.java.
Running Self Managed Couchbase Cluster
If you are running this quickstart with a self managed Couchbase cluster, you need to load the travel-sample data bucket in your cluster and generate the credentials for the bucket.
You need to update the connection string and the credentials in the src/main/resources/application.properties file.
NOTE: Couchbase must be installed and running prior to running the Spring Boot app.
Swagger Documentation
Swagger documentation provides a clear view of the API including endpoints, HTTP methods, request parameters, and response objects.
Click on an individual endpoint to expand it and see detailed information. This includes the endpoint's description, possible response status codes, and the request parameters it accepts.
Trying Out the API
You can try out an API by clicking on the "Try it out" button next to the endpoints.
-
Parameters: If an endpoint requires parameters, Swagger UI provides input boxes for you to fill in. This could include path parameters, query strings, headers, or the body of a POST/PUT request.
-
Execution: Once you've inputted all the necessary parameters, you can click the "Execute" button to make a live API call. Swagger UI will send the request to the API and display the response directly in the documentation. This includes the response code, response headers, and response body.
Models
Swagger documents the structure of request and response bodies using models. These models define the expected data structure using JSON schema and are extremely helpful in understanding what data to send and expect.


