Quickstart with Peer-to-Peer Sync in C# and Xamarin Forms
- Build a Xamarin App in C# with Xamarin Forms that uses Peer-to-Peer Sync
- Learn how you can sync data between devices without Sync Gateway or Couchbase Server
- Configure websockets listeners with various TLS and client authentication modes
Abstract
This tutorial uses a simple inventory tracker app to demonstrate the peer-to-peer database sync functionality introduced in Couchbase Lite 2.8.
Introduction
Couchbase Lite 2.8 release supports out-of-the-box support for secure Peer-to-Peer Sync, over websocket, between Couchbase Lite enabled clients in IP-based networks without the need for a centralized control point (i.e. you do not need a Sync Gateway or Couchbase Server to get peer-to-peer database sync going)
This tutorial will demonstrate how to:
- Use a UDP type socket to listen on a specified port for peer discovery. Broadcast it's own IP address over UDP type socket. +
NOTE: UWP app needs to be added to the Exception list on the Windows Firewall.
- Configure a websocket listener to listen to incoming requests. We will walk through various TLS modes and client authentication modes.
- Start a bi-directional replication from active peer.
- Sync data between connected peers
Throughout this tutorial, these terms are used interchangeably:
- "passive peer", "server" and "listener" all refer to the peer on which the websocket listener is startedf
- "active peer" and "client" both refer to the peer on which the replicator is initialized
We will be using simple inventory apps in Xamarin UWP, iOS, and Android as an example to demonstrate the peer-to-peer functionality.
You can learn more about Couchbase Lite on our docs site.
Prerequisites
This tutorial assumes familiarity with building Xamarin apps with Visual Studio and Couchbase Lite.
-
Visual Studio 2019 (Download it from the Microsoft Website with:
- Universal Windows Platform component installed
- Environment setup for Xamarin Development (Xamarin component installed for Android and iOS development)
-
If you are unfamiliar with the basics of Couchbase Lite, it is recommended that you follow the Getting> Started guides
-
Wi-Fi network that the peers can communicate over +
You could run your peers in multiple simulators. But if you were running the app on real devices, then you will need to ensure that the devices are on the same WiFi network
App Overview
This is a simple inventory app that can be used as a passive> or active> peer.
The app uses a local database that is pre-populated with data. There is no Sync Gateway or Couchbase Server installed.
When used as a passive peer, users can:
- Log in and start a websocket listener for the Couchbase Lite database. The Listener IP endpoint is advertised over UDP type socket when users enter the
ListenerPage - View the status of connected clients
- Directly sync data with connected clients
When used as an active peer, users can:
- Log in and enter the
ListenersBrowserPageto start browsing for peers - Connect to a listener
- Directly sync data with connected clients
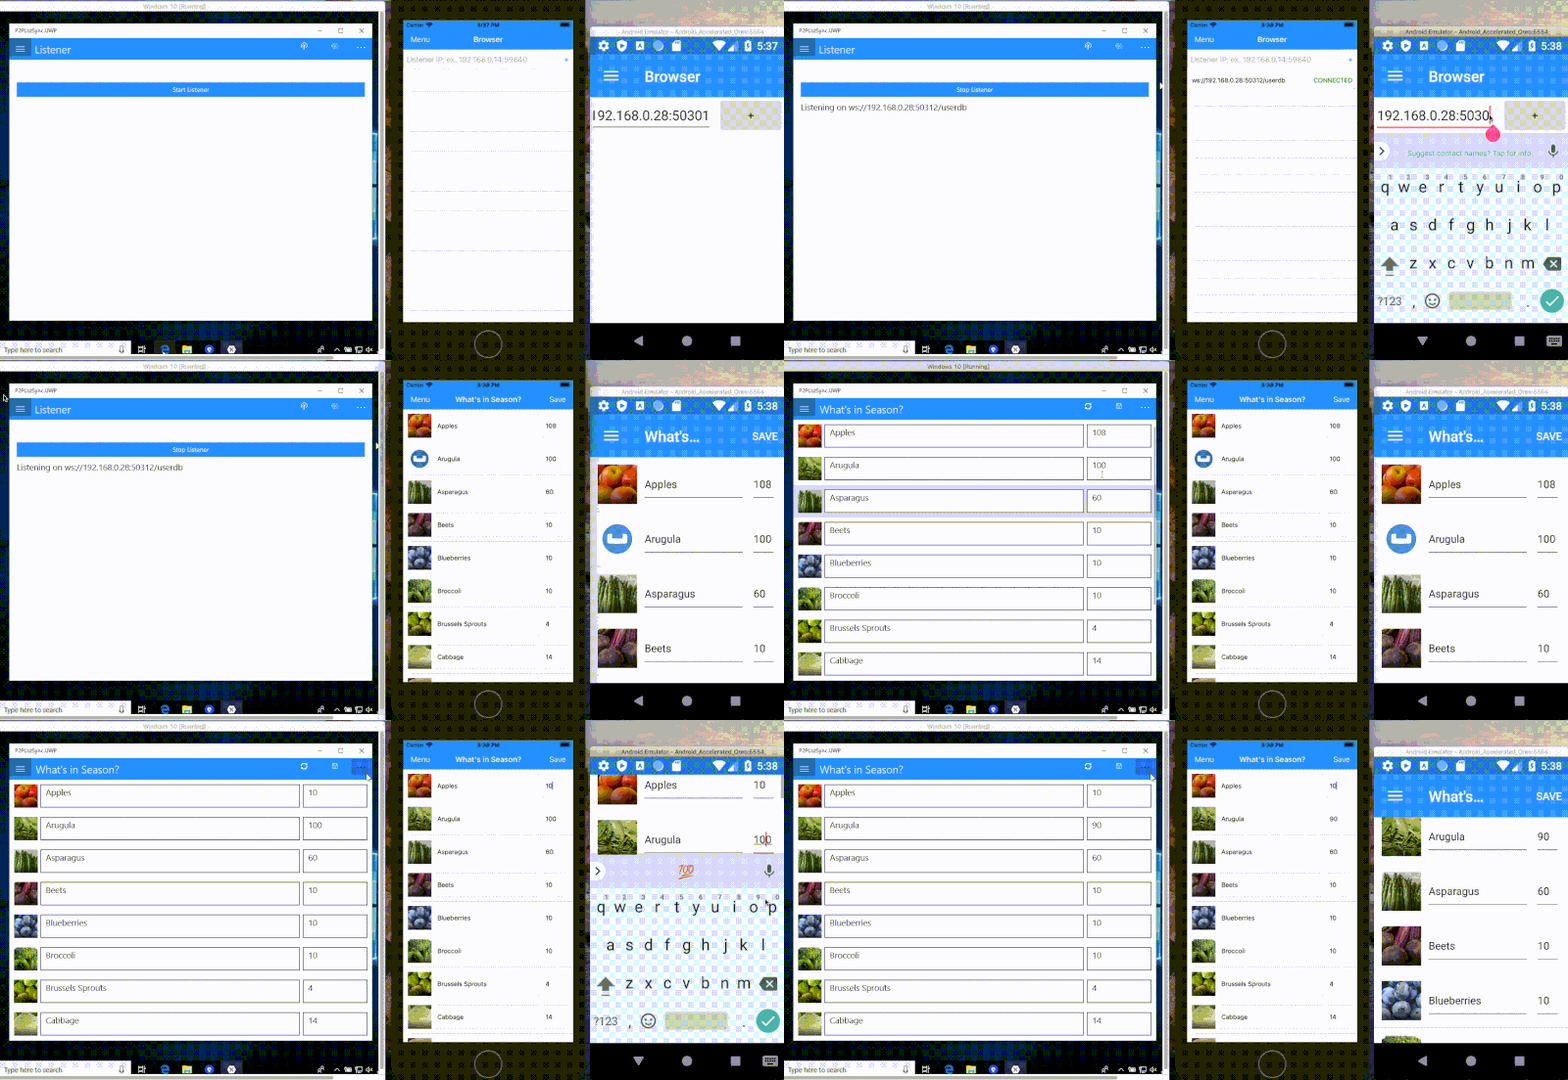
Example 1. The app in action
App Installation
- Clone the repo
git clone <https://github.com/couchbaselabs/couchbase-lite-peer-to-peer-sync-examples>Try it Out
- Open the Xamarin .Net project using Visual Studio
- Build and run the project If you are running Android apps on emulators, please see Connecting to Android emulator over localhost
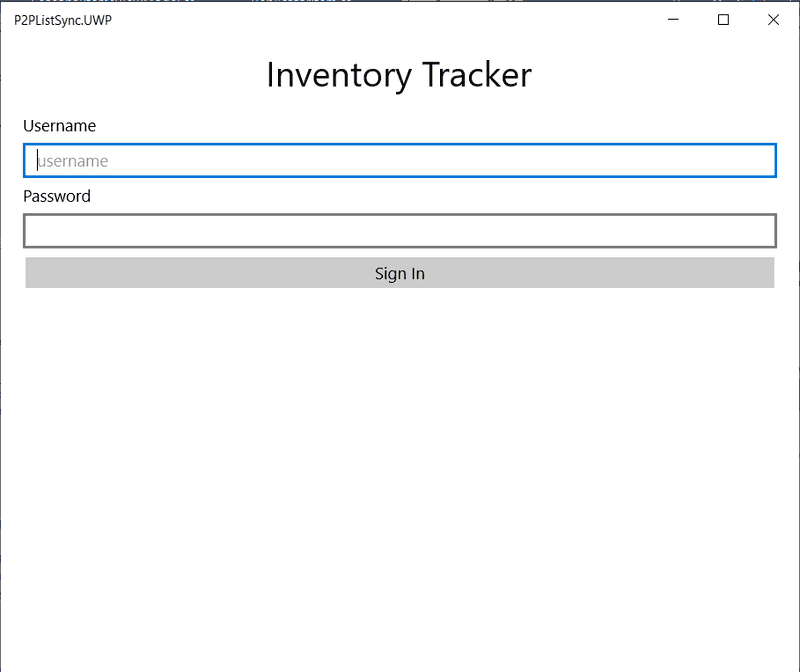
- Verify that you see the login screen
- If you are having trouble running the Xamarin iOS sample app, please see Having issue running the Xamarin iOS app?
Exploring the App Project
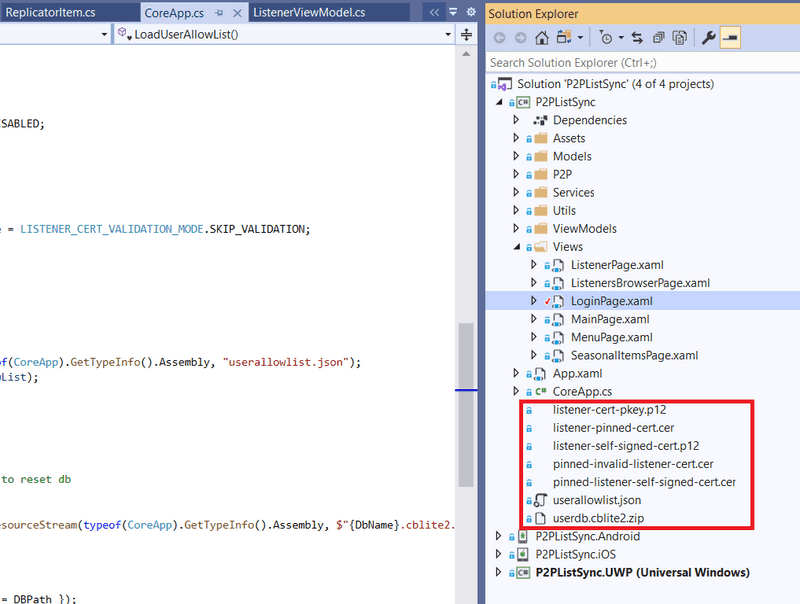
- The Xamarin .Net project comes pre-bundled with some resource files that we will examine here
userdb.cblite2.zip: A zip file containing a prebuilt Couchbase Lite database. It includes the data for a single document. See Data Modeluserallowlist.json: List of valid client users (and passwords) in the system. This list is looked up when the server tries to authenticate credentials associated with incoming connection request.listener-cert-pkey.p12: This is PKCS12> file archive that includes a public key cert corresponding to the listener and associated private key. The cert is a sample cert that was generated using OpenSSL> tool.listener-pinned-cert.cer: This is the public key listener cert (the same cert that is embedded in thelistener-cert-pkey.p12file) in DER encoded format. This cert is pinned on the client replicator and is used for validating server cert during connection setup.
Data Model
Couchbase Lite is a JSON Document Store. A Document is a logical collection of named fields and values. The values are any valid JSON types. In addition to the standard JSON types, Couchbase Lite supports some special types like Date and Blob.
While it is not required or enforced, it is a recommended practice to include a "type" property that can serve as a namespace for related documents.
The "List" Document
The app deals with a single Document with a "type" property of "list".
An example of a document would be
{
  "type": "list",
  "list": [
  {
    "image": {
      "length":16608,
      "digest":"sha1-LEFKeUfywGIjASSBa0l/cg5rlm8=",
      "content_type":"image/jpeg",
      "@type":"blob"
    },
    "value":10,
    "key":"Apples"
  },
  {
    "image": {
      "length":16608,
      "digest":"sha1-LEFKeUsswGIjASssSBa0l/cg5rlm8=",
      "content_type":"image/jpeg",
      "@type":"blob"
    },
    "value":110,
    "key":"oranges"
    }
  ]
}
Initializing Local Database
The app extracts a prebuilt database zip file named userdb.cblite2.zip into DBPath the first time the database is created. This is done regardless of whether the app is launched in passive or active mode.
- Open the CoreApp.cs file and locate the
LoadAndInitDBmethod. This method extract and place the Couchbase Lite database inDBPathfor the user if one does not exist.
if (!Database.Exists(DbName, DBPath))
{
    using (var dbZip = new ZipArchive(ResourceLoader.GetEmbeddedResourceStream(typeof(CoreApp).GetTypeInfo().Assembly, $"{DbName}.cblite2.zip")))
    {
        dbZip.ExtractToDirectory(DBPath);
    }
}
DB = new Database(DbName, new DatabaseConfiguration() { Directory = DBPath });- Open the SeasonalItemsViewModel.cs file and locate the
SeasonalItemsViewModelconstructor. It creates a LiveQuery to pick up document changes in the inventory list array when the ViewModel loads the first time. Each array item contains a dictionary with three key value pairs. Their keys are "key", "value", and "image" and their values are mapped to the propertiesName,Quantity, andImagein .Net ObjectSeasonalItem. The "image" property holds a blob entry to an image.
 var q = QueryBuilder.Select(SelectResult.All())
    .From(DataSource.Database(_db))
    .Where(Meta.ID.EqualTo(Expression.String(CoreApp.DocId)))
    .AddChangeListener((sender, args) =>
    {
      var allResult = args.Results.AllResults();
      var result = allResult[0];
      var dict = result[CoreApp.DB.Name].Dictionary;
      var arr = dict.GetArray(CoreApp.ArrKey);

      if (arr.Count < Items.Count)
        Items = new ObservableConcurrentDictionary<int, SeasonalItem>();

      Parallel.For(0, arr.Count, i =>
      {
        var item = arr[i].Dictionary;
        var name = item.GetString("key");
        var cnt = item.GetInt("value");
        var image = item.GetBlob("image");

        if (_items.ContainsKey(i)) {
          _items[i].Name = name;
          _items[i].Quantity = cnt;
          _items[i].ImageByteArray = image?.Content;
        } else {
          var seasonalItem = new SeasonalItem {
            Index = i,
            Name = name,
            Quantity = cnt,
            ImageByteArray = image?.Content
          };
          _items.Add(i, seasonalItem);
        }
      });
    });
Passive Peer or Server
First, we will walk through the steps of using the app in passive peer mode
Initializing Websocket Listener
- Open the ListenerViewModel.cs file and locate the
CreateListenerfunction. This is where the websocket listener for peer-to-peer sync is initialized
var listenerConfig = new URLEndpointListenerConfiguration(_db); // <1>
listenerConfig.NetworkInterface = GetLocalIPv4(NetworkInterfaceType.Wireless80211) ?? GetLocalIPv4(NetworkInterfaceType.Ethernet);
listenerConfig.Port = 0; // Dynamic port

switch (CoreApp.ListenerTLSMode) { // <2>
  case LISTENER_TLS_MODE.DISABLED:
    listenerConfig.DisableTLS = true;
    listenerConfig.TlsIdentity = null;
    //end::TLSDisabled[]
    break;
  case LISTENER_TLS_MODE.WITH_ANONYMOUS_AUTH:
    listenerConfig.DisableTLS = false; // Use with anonymous self signed cert if TlsIdentity is null
    listenerConfig.TlsIdentity = null;
    //end::TLSWithAnonymousAuth[]
    break;
  case LISTENER_TLS_MODE.WITH_BUNDLED_CERT:
    listenerConfig.DisableTLS = false;
    listenerConfig.TlsIdentity = ImportTLSIdentityFromPkc12(ListenerCertLabel);
    break;
  case LISTENER_TLS_MODE.WITH_GENERATED_SELF_SIGNED_CERT:
    listenerConfig.DisableTLS = false;
    listenerConfig.TlsIdentity = CreateIdentityWithCertLabel(ListenerCertLabel);
    break;
}

listenerConfig.EnableDeltaSync = true; // <3>

if (CoreApp.RequiresUserAuth) { // <4>
  listenerConfig.Authenticator = new ListenerPasswordAuthenticator((sender, username, password) =>
  {
    // ** This is only a sample app to use an existing users credential shared cross platforms.
    //    Developers should use SecureString password properly.
    var found = CoreApp.AllowedUsers.Where(u => username == u.Username && new NetworkCredential(string.Empty, password).Password == u.Password).SingleOrDefault();
    return found != null;
  });
}

_urlEndpointListener = new URLEndpointListener(listenerConfig)- Initialize the
URLEndpointListenerConfigurationfor the specified database. There is a listener for a given database. You can specify a port to be associated with the listener. In our app, we let Couchbase Lite choose the port. - This is where we configure the TLS mode. In the app, we have a flag named
ListenerTLSModethat allows the app to switch between the various modes. You can change the mode by changing the value of the variable. See Testing Different TLS Modes - Enable delta sync. It is disabled by default
- Configure the password authenticator callback function that authenticates the username/password received from the client during replication setup. The list of valid users are configured in
userallowlist.jsonfile bundled with the app
Testing Different TLS Modes
The app can be configured to test different TLS modes as follows by setting the ListenerTLSMode property in the CoreApp.cs file
public static LISTENER_CERT_VALIDATION_MODE ListenerCertValidationMode = LISTENER_CERT_VALIDATION_MODE.SKIP_VALIDATION| ListenerTLSMode Value | Behavior |
|---|---|
| SKIP_VALIDATION | There is no TLS. All communication is plaintext (insecure mode and not recommended in production) |
| WITH_ANONYMOUS_AUTH | The app uses self-signed cert that is auto-generated by Couchbase Lite as TLSIdentity of the server. While server authentication is skipped, all communication is still |
| encrypted. This is the default mode of Couchbase Lite. | |
| WITH_BUNDLED_CERT | The app generates TLSIdentity of the server from public key cert and private key bundled in the listener-cert-pkey.p12 archive. Communication is encrypted |
| WITH_GENERATED_SELF_SIGNED_CERT | The app uses Couchbase Lite CreateIdentity convenience API to generate the TLSIdentity of the server. Communication is encrypted |
Start Websocket Listener
- Open the ListenerViewModel.cs file and locate the
ExecuteStartListenerCommandmethod.
_urlEndpointListener.Start()Advertising Listener Service
In the app, we broadcast listener's IP endpoint over UDP type socket.
- Open the ListenerViewModel.cs file and look for
Broadcastmethod. Here, we create a Socket with Udp ProtocolType and broadcast listener's IP endpoint to the peers are listening in local network. Please note, this App requires peers to start peer discovery before listener start broadcasting. Otherwise, you will have to manually broadcast the listener IP. Please see <<tryit10,Try it out>> for detail.
public void Broadcast()
{
  if (!IsListening)
    return;

  using (var socket = new Socket(AddressFamily.InterNetwork, SocketType.Dgram, System.Net.Sockets.ProtocolType.Udp)) {
    socket.EnableBroadcast = true;
    var group = new IPEndPoint(IPAddress.Broadcast, CoreApp.UdpPort);
    var hi = Encoding.ASCII.GetBytes($"{CoreApp.Guid}:{_urlEndpointListener.Urls[0].Host}:{_urlEndpointListener.Port}");
    socket.SendTo(hi, group);
    socket.Close();
  }
}
Stop Websocket Listener
- Open the ListenerViewModel.cs file and locate the
ExecuteStartListenerCommandmethod. You can stop the listener after the listener is started.
_urlEndpointListener.Stop()
_urlEndpointListener.Dispose();
Try it out
- Run the app on a simulator or a real device. If it's the latter, make sure you sign your app with the appropriate developer certificate
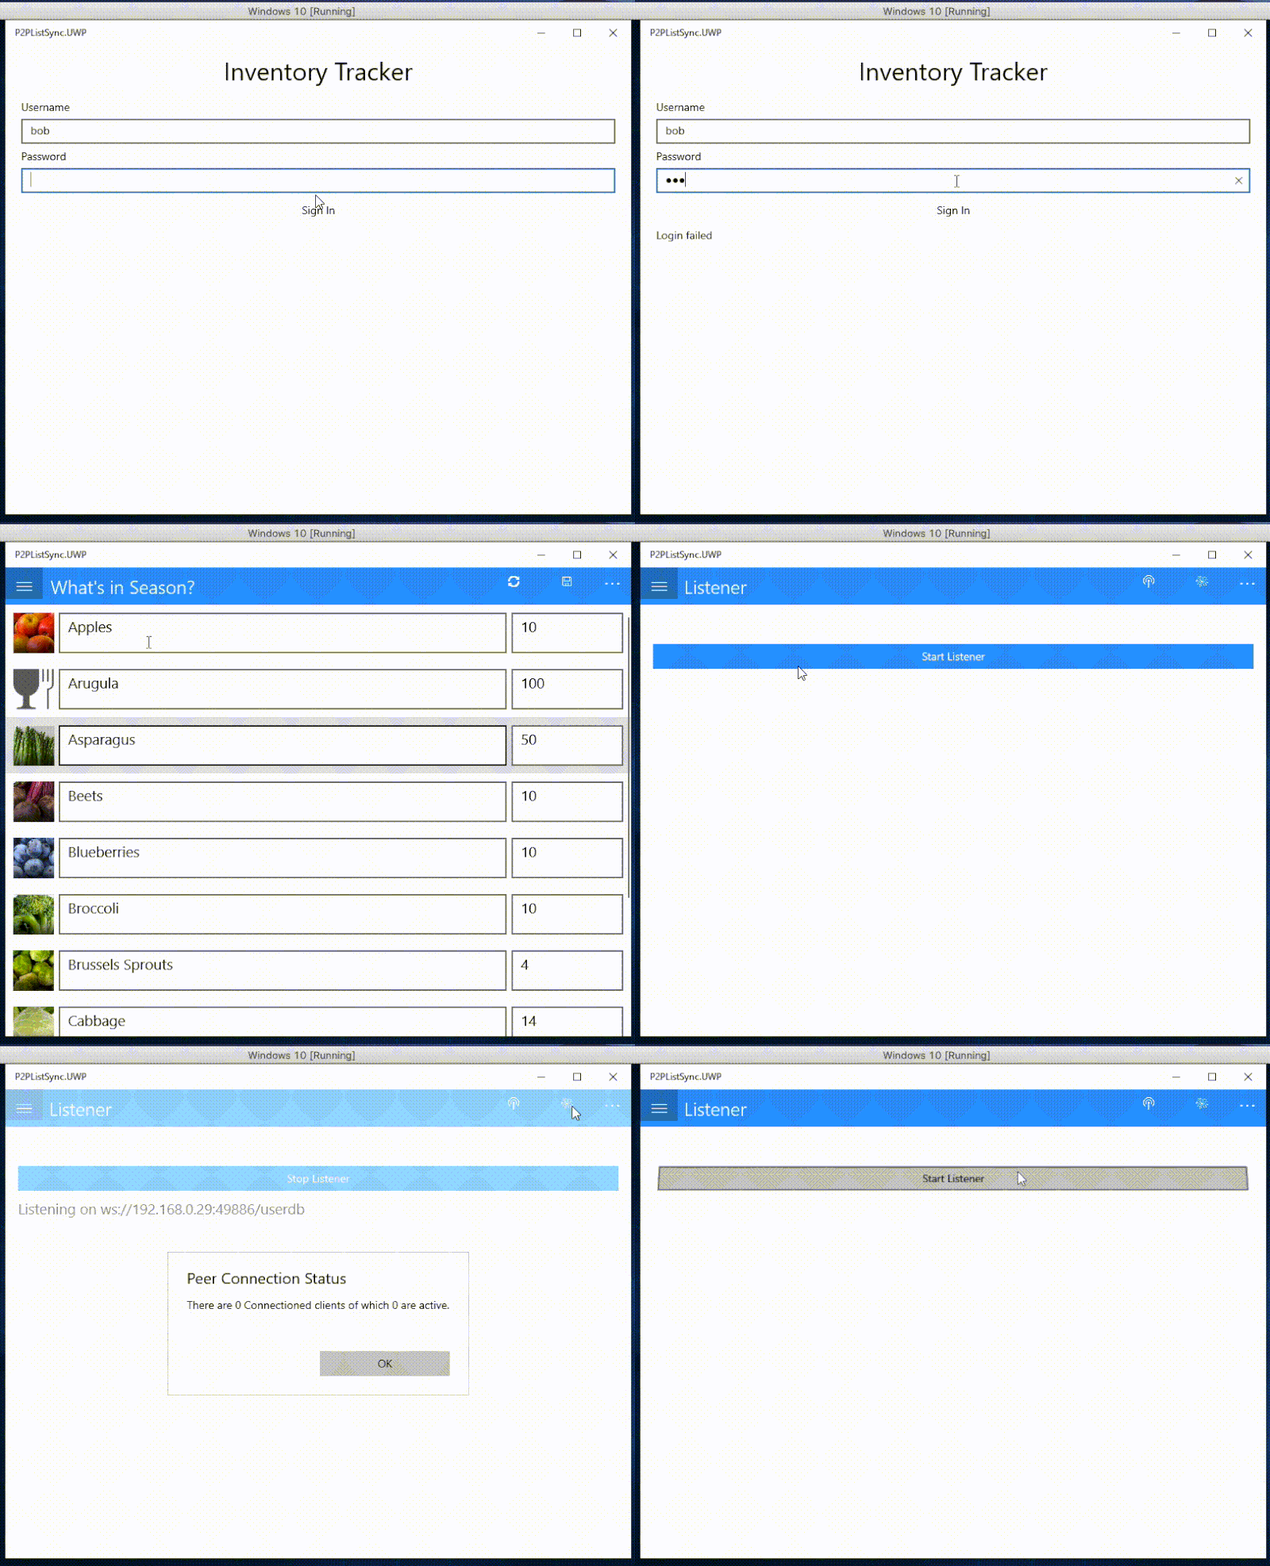
- On the login screen, sign in as any one of the users configured in the
userallowlist.jsonfile, such as "bob" and "password" - You can find 4 selections (
What's in Season?,Listener,Browser, andLogout) under the "hamburger" menu located on the upper left hand side. - From the
ListenerPage, selectListenerfrom the "hamburger" menu, start the listener by clicking on "Start Listener" button - You can see 2 toolbar items (
BroadcastandPeers) Note: These two items will do nothing if listener is not started. - Click on the "Peers" toolbar item to see the number of connected clients. It should be zero if there are no connected clients
- If you don't see your listener's IP endpoint showing up on a peers'
ListenersBrowserPage, click on the listener's "Broadcast" toolbar item to broadcast its IP endpoint - From the
ListenerPage, stop the listener by clicking on "Stop Listener" button
Example 2.App in action - start passive peer
Active Peer or Client
We will walk through the steps of using the app in active peer mode
Discovering Listeners
In the app, we use UDP Type Socket to listen on port 15000 for listener. Please note, port 15000 is used by UDP Type Socket, not used by the websocket listener. Couchbase Lite choose the port when a websocket listener is created.
- Open the ListenersBrowserViewModel.cs file and look for
ListenersBrowserViewModelconstructor. Here, we create aUdpListenerwith the port it listens on and pick up any raised Udp packet received event (Listener's broadcasting IP endpoint).
{
  Title = "Browser";
  Items = new ObservableCollection<ReplicatorItem>();

  _discovery = new UdpListener(CoreApp.UdpPort);
  _discovery.UdpPacketReceived += DiscoveryOnUdpPacketReceived;
  _discovery.Start();
}

# region discover event

private void DiscoveryOnUdpPacketReceived(object sender, UdpPacketReceivedEventArgs args)
{
  var msg = Encoding.ASCII.GetString(args.Data);
  var msgArr = msg.Split(':');
  var remoteId = Guid.Parse(msgArr[0]);
  if (remoteId == CoreApp.Guid) return;
  var remoteIP = IPAddress.Parse(msgArr[1]);
  var remotePort = Int32.Parse(msgArr[2]);
  var remoteEndpoint = new IPEndPoint(remoteIP, remotePort);

  AddReplicator(remoteEndpoint);
}
Explore the content in the UdpListener.cs. It includes implementation of creating Socket with Udp ProtocolType, start and stop the listener, and UdpPacketReceived EventHandler.
Initializing and Starting Replication
Initializing a replicator for peer-to-peer sync is fundamentally the same as if the Couchbase Lite client were to sync> with a remote Sync Gateway.
- Open the ReplicatorItem.cs file and locate the
ExecuteStartReplicatorCommandmethod. If you have been using Couchbase Lite to sync data with Sync Gateway, this code should seem very familiar. In this function, we initialize a bi-directional replication to the listener peer in continuous mode. We also register a Replication Listener to be notified of status to the replication status.
public ReplicatorItem(IPEndPoint listenerEndpoint)
{
  _listenerEndpoint = listenerEndpoint;
  StartReplicatorCommand = new Command(() => ExecuteStartReplicatorCommand());
  CreateReplicator(ListenerEndpointString);
}

~ReplicatorItem()
{
    Dispose(disposing: false);
}

# endregion

public void CreateReplicator(string PeerEndpointString)
{
  if(_repl != null) {
    return;
  }

  Uri host = new Uri(PeerEndpointString);
  var dbUrl = new Uri(host, _db.Name);
  var replicatorConfig = new ReplicatorConfiguration(_db, new URLEndpoint(dbUrl)); // <1>
  replicatorConfig.ReplicatorType = ReplicatorType.PushAndPull;
  replicatorConfig.Continuous = true;

  if (CoreApp.ListenerTLSMode > 0) {

    // Explicitly allows self signed certificates. By default, only
    // CA signed cert is allowed
    switch (CoreApp.ListenerCertValidationMode) { // <2>
      case LISTENER_CERT_VALIDATION_MODE.SKIP_VALIDATION:
        // Use acceptOnlySelfSignedServerCertificate set to true to only accept self signed certs.
        // There is no cert validation
        replicatorConfig.AcceptOnlySelfSignedServerCertificate = true;
        break;

      case LISTENER_CERT_VALIDATION_MODE.ENABLE_VALIDATION_WITH_CERT_PINNING:
        // Use acceptOnlySelfSignedServerCertificate set to false to only accept CA signed certs
        // Self signed certs will fail validation

        replicatorConfig.AcceptOnlySelfSignedServerCertificate = false;

        // Enable cert pinning to only allow certs that match pinned cert

        try {
            var pinnedCert = LoadSelfSignedCertForListenerFromBundle();
            replicatorConfig.PinnedServerCertificate = pinnedCert;
        } catch (Exception ex) {
            Debug.WriteLine($"Failed to load server cert to pin. Will proceed without pinning. {ex}");
        }

        break;

      case LISTENER_CERT_VALIDATION_MODE.ENABLE_VALIDATION:
        // Use acceptOnlySelfSignedServerCertificate set to false to only accept CA signed certs
        // Self signed certs will fail validation. There is no cert pinning
        replicatorConfig.AcceptOnlySelfSignedServerCertificate = false;
        break;
    }
  }

  if (CoreApp.RequiresUserAuth) {
    var user = CoreApp.CurrentUser;
    replicatorConfig.Authenticator = new BasicAuthenticator(user.Username, user.Password); // <3>
  }

  _repl = new Replicator(replicatorConfig); // <4>
  _listenerToken = _repl.AddChangeListener(ReplicationStatusUpdate);
}

public void ExecuteStartReplicatorCommand()
{
  if (!IsStarted) {
_repl.Start(); // <5>- Initialize a Repicator Configuration for the specified local database and remote listener URL endpoint
- This is where we configure the TLS server cert validation mode - whether we enable cert validation or skip validation. This would only apply if you had enabled TLS support on listener as discussed in tlsmodes,TLS Modes on Listener. If you skip server cert validation, you still get encrypted communication, but you are communicating with an un-trusted listener. In the app, we have a flag named
ListenerCertValidationModethat allows you to try the various modes. You can change the mode by changing the value of the variable. See Testing Different Server Authentication Modes - The app uses basic client authentication to authenticate with the server
- Initialize the Replicator
- Start replication. The app uses the events on the Replicator Listener to listen to monitor the replication.
Testing Different Server Authentication Modes
In Initializing Websocket Listener section, we discussed the various ways the listener TLSIdentity can be configured. Here, we describe the corresponding changes on the replicator side to authenticate the server identity. The app can be configured to test the different TLS modes (tlscertauth) by setting the ListenerCertValidationMode property in the CoreApp.cs file.
Naturally, if you have initialized the listener with TLSDisabled mode, then skip this section as there is no TLS.
public static LISTENER_CERT_VALIDATION_MODE ListenerCertValidationMode = LISTENER_CERT_VALIDATION_MODE.SKIP_VALIDATION| ListenerCertValidationMode Value | Behavior |
|---|---|
| SKIP_VALIDATION | There is no authentication of server cert. The server cert is a self-signed cert. This is typically used in dev or test environments. Skipping server cert authentication |
| is discouraged in production environments. Communication is encrypted. | |
| ENABLE_VALIDATION | If the listener cert is from a well known CA then you will use this mode. Of course, in our sample app, the istener cert as specified in listener-cert-pkey is a self |
| signed cert - so you probably will not use this mode to to test. But if you have a CA signed cert, you can configure your listener with the CA signed cert and use this | |
| mode to test. Communication is encrypted. | |
| ENABLE_VALIDATION_WITH_CERT_PINNING | In this mode, the app uses the pinned cert,listener-pinned-cert.cer that is bundled in the app to validate the listener identity. Only the server cert that exactly matches |
| the pinned cert will be authenticated. Communication is encrypted. |
Stopping Replication
- Open the ReplicatorItem.cs file and locate the
StopReplicatormethod. If you have been using Couchbase Lite to sync data with Sync Gateway, this code should seem very familiar. In this function, we remove any listeners attached to the replicator and stop it. You can restart the replicator withExecuteStartReplicatorCommandmethod
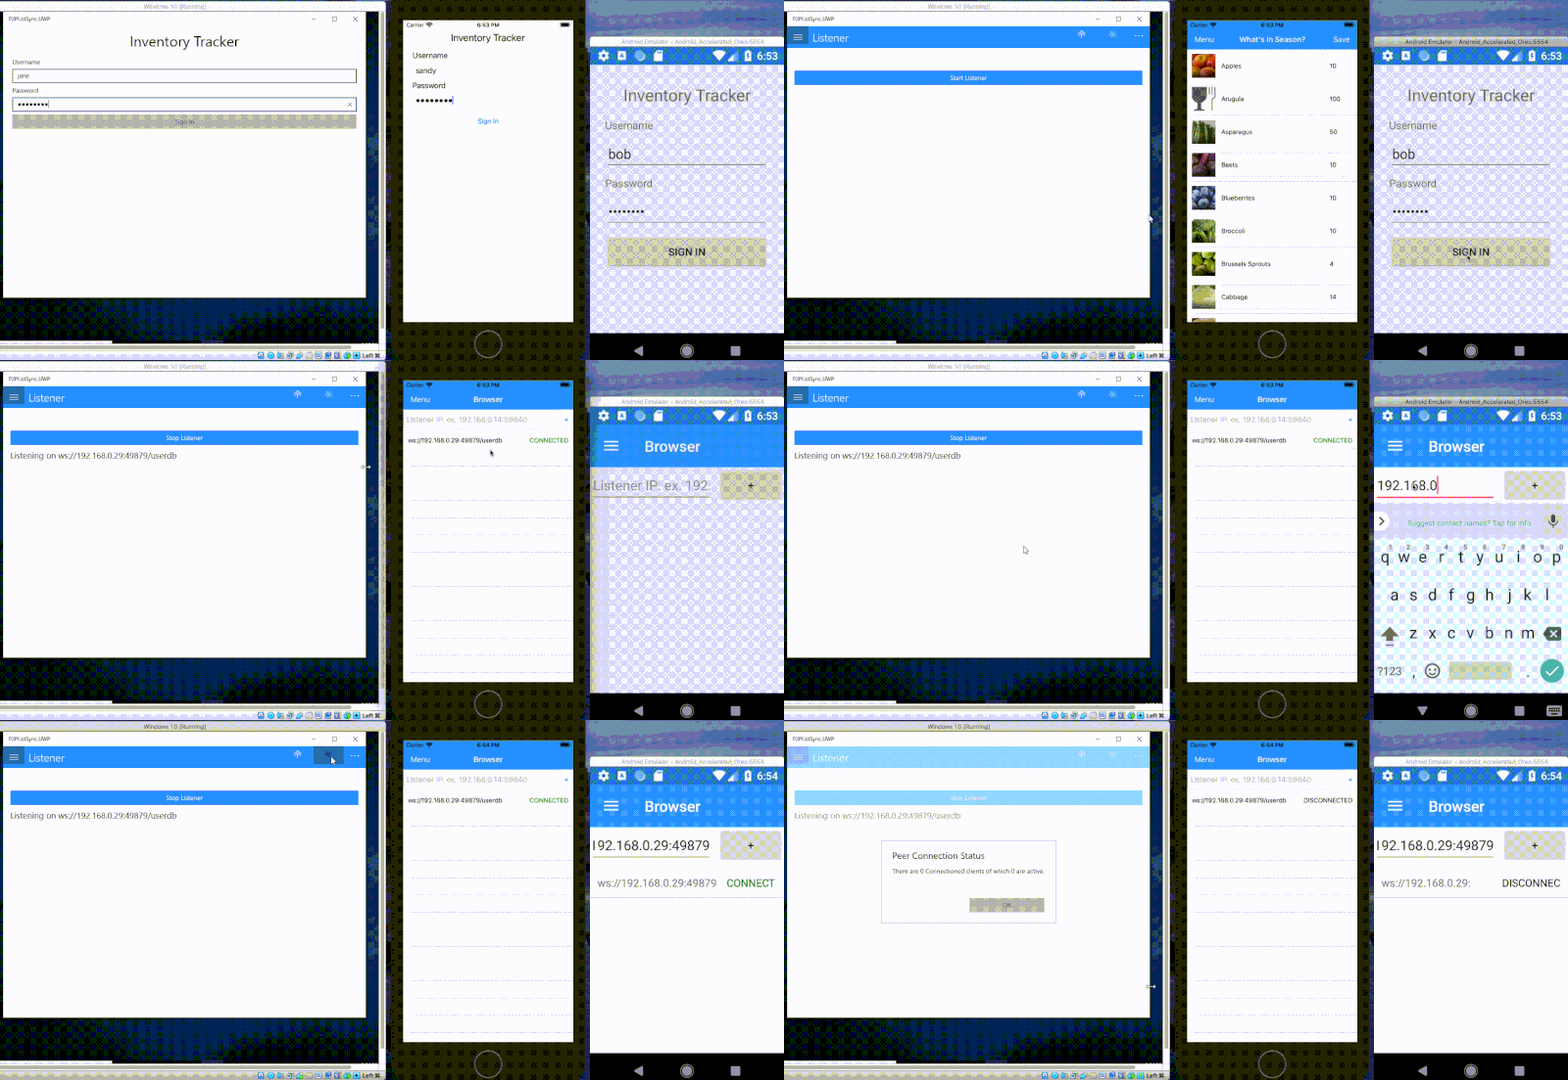
_repl?.Stop()Try it out
- Follow instructions in the Try it out section of [Passive Peer or Server](#passive-peer-or-server to start app in passive mode on a simulator instance or real device.
- Run the app on a separate simulator instance or a real device. If its the latter, make sure you sign your app with the appropriate developer certificate
- On login screen, sign in as any one of the users configured in the
userallowlist.jsonfile such as "bob" and "password". An an exercise, try with an invalid user and ensure it fails - You can find 4 selections (
What's in Season?,Listener,Browser, andLogout) under the "hamburger" menu located on the upper left hand side. - Select "Browser" from the "hamburger" menu. The app automatically browses for listener and lists it here when any listener is broadcasting.
NOTE: If the listener is not started before listeners browser ("Browser") is selected, you will need to click Broadcast toolbar item locates on top of the ListenerPage (See Broadcast in Passive Peer or Server)
NOTE: You will need to manually enter the listener's IP endpoint (ex. 192.168.0.14:59840) for Xamarin android app.
- Tap on the row corresponding to listener. This will start replication with the listener and it should transition to Connected state
- Verify the connection count on listener by clicking "Peers" toolbar item locates on top of the
ListenerPage(SeeBroadcastin Passive Peer or Server) - Tap on the row corresponding to listener again. This will stop replication with the listener and it should transition to Disconnected state. Try Disconnect and then reconnect again
- Swipe left (iOS) or long press (Android) or left click (UWP) on the the row. You should see the option to remove listener
Example 3. App in action -- start active peer
Syncing Data
Once the connection is established between the peers, you can start syncing. Couchbase Lite takes care of it.
Try it out
- Run the app on two or more simulators or real devices. If its the latter, make sure you sign your app with the appropriate developer certificate
- Start the listener on one of the app instances. You could also have multiple listeners.
- Connect the other instances of the app to the listener
- You can find 4 selections (
What's in Season?,Listener,Browser, andLogout) under "hamburger" menu locates on the upper left hand side. - Enter
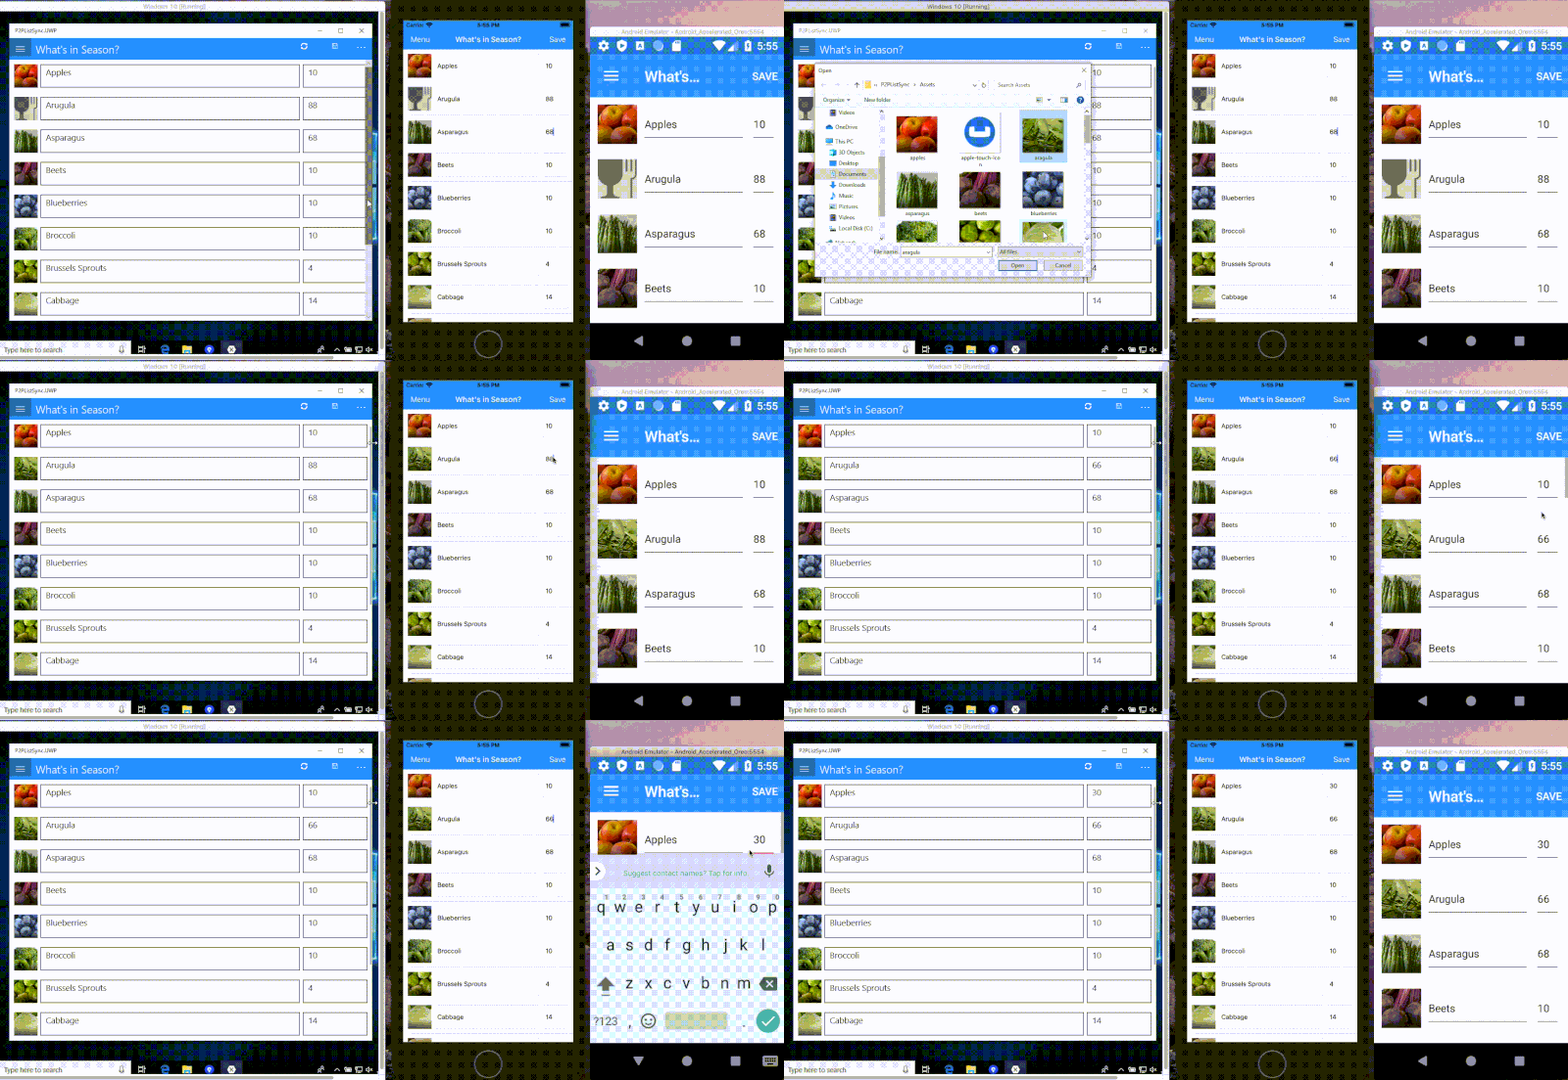
SeasonalItemsPageby selecting "What's in Season?" from the "hamburger" menu. - Edit the quantity and/or image on one or multiple instance(s) and press Save when you are done editing
- Watch it sync automatically to other connected clients
Example 4. App in action -- sync
What Next
As an exercise, switch between the various TLS modes and server cert validation modes and see how the app behaves. You can also try with different topologies to connect the peers.
Learn More
Congratulations on completing this tutorial!
This tutorial walked you through an example of how to directly synchronize data between Couchbase Lite enabled clients. While the tutorial is for Xamarin .Net, the concepts apply equally to other Couchbase Lite platforms.
Further Reading
Checkout the complete documentation on our docs site.
Troubleshoot
Having issue running the Xamarin iOS app?
- Xamarin iOS p2p sample app should build and run with Visual Studio 2019 with latest updates and XCode 12.0.1
- If you have Xcode 11 and try to run the iOS app on simulator and the simulator is not loading, try launch the simulator via Xcode and select that simulator when launching it from VS.
Connecting to Android emulator over localhost
When starting a listener on Android emulator and trying to connect it from another emulator or iOS simulator on localhost, the following steps must be followed
- Setup port forwarding. For instance, if the listener is listening on port 35262, the command to run on the terminal of the host machine would be:
adb forward tcp:35262 tcp:35262- You cannot connect to emulator directly over localhost.
Regardless of the IP address in the displayed URL, the replicator app must ignore it and use "127.0.0.1" as the host address.
For example, if the listener is listening on "10.2.0.15: 35262" , then you must connect to URL "127.0.0.1: 35262".
Cannot connect Android app active peer to passive peer when you are using Xamarin.Android SDK 9.x or other older version?
Go to Advanced Android Options (Android Project Properties -> Android Options -> Advanced button) and change SSL/TLS implementation configuration to Managed TLS 1.0 from Native TLS 1.2+.
