Build an Agentic RAG Application with Couchbase and AG2
- Learn how Couchbase and AG2 simplify RAG applications
- Store and retrieve document embeddings with Couchbase Vector Search
- Build an AI agent that answers questions from documentation links
Using RetrieveChat Powered by Couchbase Capella for Retrieve Augmented Code Generation and Question Answering
This tutorial will show you how we've made building Retrieval-Augmented Generation (RAG) applications much easier with Couchbase and AG2. By leveraging Couchbase's Search vector index for storing and retrieving document embeddings, along with AG2's powerful AI capabilities, our integration simplifies the entire process. As part of this tutorial, we'll also build a demo application where an AI agent can answer questions based on documentation links provided for any framework. This hands-on approach will demonstrate how effortlessly you can create intelligent, context-aware AI applications using this integration.
RetrieveChat is a conversational system for retrieval-augmented code generation and question answering. In this notebook, we demonstrate how to utilize RetrieveChat to generate code and answer questions based on customized documentations that are not present in the LLM's training dataset. RetrieveChat uses the AssistantAgent and RetrieveUserProxyAgent, which is similar to the usage of AssistantAgent and UserProxyAgent in other notebooks (e.g., Automated Task Solving with Code Generation, Execution & Debugging). Essentially, RetrieveUserProxyAgent implement a different auto-reply mechanism corresponding to the RetrieveChat prompts.
Some extra dependencies are needed for this notebook, which can be installed via pip
%pip install "pyautogen[openai,retrievechat-couchbase]==0.8.7" "flaml[automl]==2.3.4" couchbase==4.3.3
# For more information, please refer to the [installation guide](/docs/installation/).
Environment Setup
Couchbase Capella Setup Instructions
Before we proceed with the notebook, we will require a Couchbase Capella Database Cluster running.
Setting Up a Free Cluster
- To set up a free operational cluster, head over to Couchbase Cloud and create an account. There, create a free cluster. For more details on creating a cluster, refer here.
Creating Required Resources
- After creating the cluster, we need to create our required bucket, scope, and collections. Head over to Data Tools. On the left-hand side panel, you will find an option to create a bucket. Assign appropriate names for the Bucket, Scope, and Collection. For this tutorial, use the following:
- Bucket Name:
new_bucket - Scope Name:
new_scope - Collection Name:
new_collection - Vector SearchIndex Name:
vector_index
- Bucket Name:
Creating a Search Index
Before proceeding further, we need to set up a search index for vector-based retrieval. This is essential for efficient querying in our RAG pipeline. Follow the steps below:
-
- Copy the index definition below to a new file index.json
- Import the file in Capella using the instructions in the documentation.
- Click on Create Index to create the index.
-
- Click on Search -> Add Index -> Import
- Copy the following index definition in the Import screen
- Click on Create Index to create the index.
Index Definition
bucket, scope, collection === sample_bucekt, sample_scope, sample_collection
{
  "name": "vector_index",
  "type": "fulltext-index",
  "params": {
    "doc_config": {
      "docid_prefix_delim": "",
      "docid_regexp": "",
      "mode": "scope.collection.type_field",
      "type_field": "type"
    },
    "mapping": {
      "default_analyzer": "standard",
      "default_datetime_parser": "dateTimeOptional",
      "default_field": "_all",
      "default_mapping": {
        "dynamic": true,
        "enabled": false
      },
      "default_type": "_default",
      "docvalues_dynamic": false,
      "index_dynamic": true,
      "store_dynamic": false,
      "type_field": "_type",
      "types": {
        "sample_scope.sample_collection": {
          "dynamic": true,
          "enabled": true,
          "properties": {
            "embedding": {
              "enabled": true,
              "dynamic": false,
              "fields": [
                {
                  "dims": 384,
                  "index": true,
                  "name": "embedding",
                  "similarity": "dot_product",
                  "type": "vector",
                  "vector_index_optimized_for": "recall"
                }
              ]
            },
            "content": {
              "enabled": true,
              "dynamic": false,
              "fields": [
                {
                  "index": true,
                  "name": "content",
                  "store": true,
                  "type": "text"
                }
              ]
            }
          }
        }
      }
    },
    "store": {
      "indexType": "scorch",
      "segmentVersion": 16
    }
  },
  "sourceType": "gocbcore",
  "sourceName": "sample_bucket",
  "sourceParams": {},
  "planParams": {
    "maxPartitionsPerPIndex": 64,
    "indexPartitions": 16,
    "numReplicas": 0
  }
}
Connecting to the Cluster
-
Now, we will connect to the cluster. Refer to this page for connection details.
-
Create a user to connect:
- Navigate to the Settings tab.
- Click Create Cluster Access and specify a username and password.
- Assign read/write access to all buckets (you may create more users with restricted permissions as needed).
- For more details, refer here.
-
Add an IP Address to the allowed list:
- In Settings, click on Networking.
- Add an allowed IP based on your requirements.
-
Set up environment variables:
Retrieve the connection string from the Connect tab. Then, configure the following environment variables:CB_CONN_STR: Couchbase Cluster Connection StringCB_USERNAME: Username of the created userCB_PASSWORD: Password of the created userOPENAI_API_KEY: OpenAI API Key (required for agents)
import os
# Environment Variables
os.environ["CB_CONN_STR"] = "<<CONNECTION_STRING_TO_YOUR_CLUSTER>>"
os.environ["CB_USERNAME"] = "<<CLUSTER_ACCESS_USERNAME>>"
os.environ["CB_PASSWORD"] = "<<CLUSTER_ACCESS_PASSWORD>>"
os.environ["OPENAI_API_KEY"] = "<<OPENAI_API_KEY>>"

# you can chge the ones below, but then  you will have to change these in the vector search index created in the couchbase cluster as well.
os.environ["CB_BUCKET"] = "sample_bucket"
os.environ["CB_SCOPE"] = "sample_scope"
os.environ["CB_COLLECTION"] = "sample_collection"
os.environ["CB_INDEX_NAME"] = "vector_index"
Voila! Your cluster is now ready to be used.
Initializing Agents
We start by initializing the AssistantAgent and RetrieveUserProxyAgent. The system message needs to be set to "You are a helpful assistant." for AssistantAgent. The detailed instructions are given in the user message. Later we will use the RetrieveUserProxyAgent.message_generator to combine the instructions and a retrieval augmented generation task for an initial prompt to be sent to the LLM assistant.
import os
import sys

from autogen import AssistantAgent

sys.path.append(os.path.abspath("/workspaces/autogen/autogen/agentchat/contrib"))

from autogen.agentchat.contrib.retrieve_user_proxy_agent import RetrieveUserProxyAgent

# Accepted file formats that can be stored in
# a vector database instance
from autogen.retrieve_utils import TEXT_FORMATS

config_list = [{"model": "gpt-4o", "api_key": os.environ["OPENAI_API_KEY"], "api_type": "openai"}]
assert len(config_list) > 0
print("models to use: ", [config_list[i]["model"] for i in range(len(config_list))])print("Accepted file formats for `docs_path`:")
print(TEXT_FORMATS)Understanding AssistantAgent in AutoGen
The AssistantAgent in AutoGen is a specialized subclass of ConversableAgent designed to perform tasks using large language models (LLMs). By default, it generates code suggestions and debugging assistance but does not execute code autonomously; it relies on user intervention for code execution.
Key Components of the AssistantAgent Initialization:
-
name: Assigns a unique identifier to the agent. -
system_message: Sets the default behavior and role of the agent. In this case, it's initialized with "You are a helpful assistant," guiding the agent to provide assistance aligned with this directive. -
llm_config: Configures the LLM's behavior with parameters like timeout settings, caching mechanisms, and a list of model configurations (config_list).
How AssistantAgent Operates:
Once initialized, the AssistantAgent can interact with users or other agents to process tasks. It leverages the specified LLM configurations to generate responses, code snippets, or debugging advice based on the input it receives. However, it does not execute code by default, awaiting user approval or execution commands.
For more detailed information, refer to the official AG2 documentation on AssistantAgent.
Implementing AssistantAgent for LLM-Powered Assistance
The provided code snippet demonstrates the creation of an AssistantAgent instance named "assistant" using the AutoGen framework. The AssistantAgent class is designed to interact with large language models (LLMs) to solve tasks, including suggesting Python code blocks and debugging. By default, it does not execute code and expects the user to handle code execution.
-
name="assistant": Assigns the name "assistant" to the agent. -
system_message="You are a helpful assistant.": Sets a system message that defines the assistant's role and behavior during interactions. -
llm_config={...}: Provides configuration settings for the LLM:timeout=600: Specifies a timeout of 600 seconds for LLM responses.cache_seed=42: Sets a seed value for caching mechanisms to ensure consistent results.config_list=config_list: Includes a list of additional configurations, which can define specific LLM models or parameters to use.
By default, the AssistantAgent has human_input_mode set to "NEVER" and code_execution_config set to False, meaning it doesn't execute code and doesn't require human input during interactions.
# 1. create an AssistantAgent instance named "assistant"
assistant = AssistantAgent( # As defined above
    name="assistant",
    system_message="You are a helpful assistant.",
    llm_config={
        "timeout": 600,
        "cache_seed": 42,
        "config_list": config_list,
    },
)
print("AssistantAgent instance created, with the configurations as defined above.")
Fetching Documentation
The following function recursively fetches all unique internal links from the given documentation URL within a specified time limit. This is useful for gathering documentation pages that will be used to augment the LLM's responses.
import requests
from bs4 import BeautifulSoup
from urllib.parse import urljoin, urlparse
import time
import os
from concurrent.futures import ThreadPoolExecutor, as_completed

def get_documentation_links(base_url, visited=None, start_time=None, time_limit=10):
    """
    Recursively fetch all unique internal links from the given documentation URL with a time constraint.

    Args:
        base_url (str): The URL of the documentation homepage.
        visited (set): A set to keep track of visited URLs.
        start_time (float): The start time of execution.
        time_limit (int): The maximum time allowed for execution in seconds.

    Returns:
        list: A list of unique internal links found in the documentation.
    """
    if visited is None:
        visited = set()
    if start_time is None:
        start_time = time.time()

    # Stop recursion if time limit is exceeded
    if time.time() - start_time > time_limit:
        return list(visited)

    try:
        response = requests.get(base_url, timeout=5)
        response.raise_for_status()
    except requests.RequestException as e:
        print(f"Error fetching the page: {e}")
        return list(visited)

    soup = BeautifulSoup(response.text, "html.parser")
    domain = urlparse(base_url).netloc

    links = set()
    for a_tag in soup.find_all("a", href=True):
        href = a_tag["href"].strip()
        full_url = urljoin(base_url, href)
        parsed_url = urlparse(full_url)

        if parsed_url.netloc == domain and full_url not in visited:  # Ensure it's an internal link within the same domain
            visited.add(full_url)
            links.add(full_url)
            links.update(get_documentation_links(full_url, visited, start_time, time_limit))  # Recursive call with time check

    return list(visited)
def fetch_content_generators(links, num_workers=5):
    """
    Splits the links into separate lists for each worker and returns generators for each worker.
    Extracts only plain text from HTML before yielding.

    Args:
        links (list): List of URLs to fetch content from.
        num_workers (int): Number of workers, each receiving a distinct set of links.

    Returns:
        list: A list of generators, one for each worker.
    """
    def fetch_content(sub_links):
        for link in sub_links:
            try:
                response = requests.get(link, timeout=5)
                response.raise_for_status()

                # Extract plain text from HTML
                soup = BeautifulSoup(response.text, "html.parser")
                text_content = soup.get_text()

                yield link, text_content
            except requests.RequestException as e:
                print(f"Error fetching {link}: {e}")
                yield link, None

    # Split links into chunks for each worker
    chunk_size = (len(links) + num_workers - 1) // num_workers  # Ensure even distribution
    link_chunks = [links[i:i + chunk_size] for i in range(0, len(links), chunk_size)]

    return [fetch_content(chunk) for chunk in link_chunks]
def save_content_to_files(links, output_folder="docs_data", num_workers=5):
"""
Uses fetch_content_generators to fetch content in parallel and save it to local files.
Args:
links (list): List of URLs to fetch content from.
output_folder (str): Folder to store the saved text files.
num_workers (int): Number of workers for parallel processing.
Returns:
list: A list of file paths where content is saved.
"""
os.makedirs(output_folder, exist_ok=True)
generators = fetch_content_generators(links, num_workers=num_workers)
file_paths = []
def process_and_save(gen, worker_id):
local_paths = []
for j, (url, content) in enumerate(gen):
if content: # Avoid saving empty or failed fetches
file_name = f"doc_{worker_id}_{j}.txt"
file_path = os.path.join(output_folder, file_name)
with open(file_path, "w", encoding="utf-8") as f:
f.write(content)
local_paths.append(file_path)
return local_paths
with ThreadPoolExecutor(max_workers=num_workers) as executor:
futures = {executor.submit(process_and_save, gen, i): i for i, gen in enumerate(generators)}
for future in as_completed(futures):
file_paths.extend(future.result())
return file_paths📌 Input Documentation Link Here
Please enter the link to the documentation below.
default_link = "https://docs.ag2.ai/docs/use-cases/notebooks/Notebooks"
main_doc_link = input(f"Enter documentation link: ") or default_link
print("Selected link:", main_doc_link)
docs_links = get_documentation_links(main_doc_link, None, None, 5)
docs_file_paths = save_content_to_files(docs_links, "./docs", 12)len(docs_file_paths), len(docs_links)(454, 454)Using RetrieveChat
The RetrieveUserProxyAgent in AutoGen is a specialized agent designed to facilitate retrieval-augmented generation (RAG) by leveraging external knowledge sources, typically a vector database. It acts as an intermediary between the user and an AI assistant, ensuring that relevant context is retrieved and supplied to the assistant for more informed responses.
How RetrieveUserProxyAgent Works
-
Query Processing & Context Retrieval
When the user submits a question, theRetrieveUserProxyAgentfirst determines if the available context is sufficient. If not, it retrieves additional relevant information from an external knowledge base (e.g., a vector database) using similarity search. -
Interaction with the Assistant
Once the relevant context is retrieved, the agent forwards both the user's query and the retrieved context to theAssistantAgent(such as an OpenAI-based model). This step ensures that the assistant generates an informed and contextually accurate response. -
Handling Responses
- If the assistant's response satisfies the user, the conversation ends.
- If the response is unsatisfactory or additional context is needed, the agent updates the context and repeats the retrieval process.
-
User Feedback & Iteration
- The user can provide feedback, request refinements, or terminate the interaction.
- If updates are needed, the agent refines the context and interacts with the assistant again.
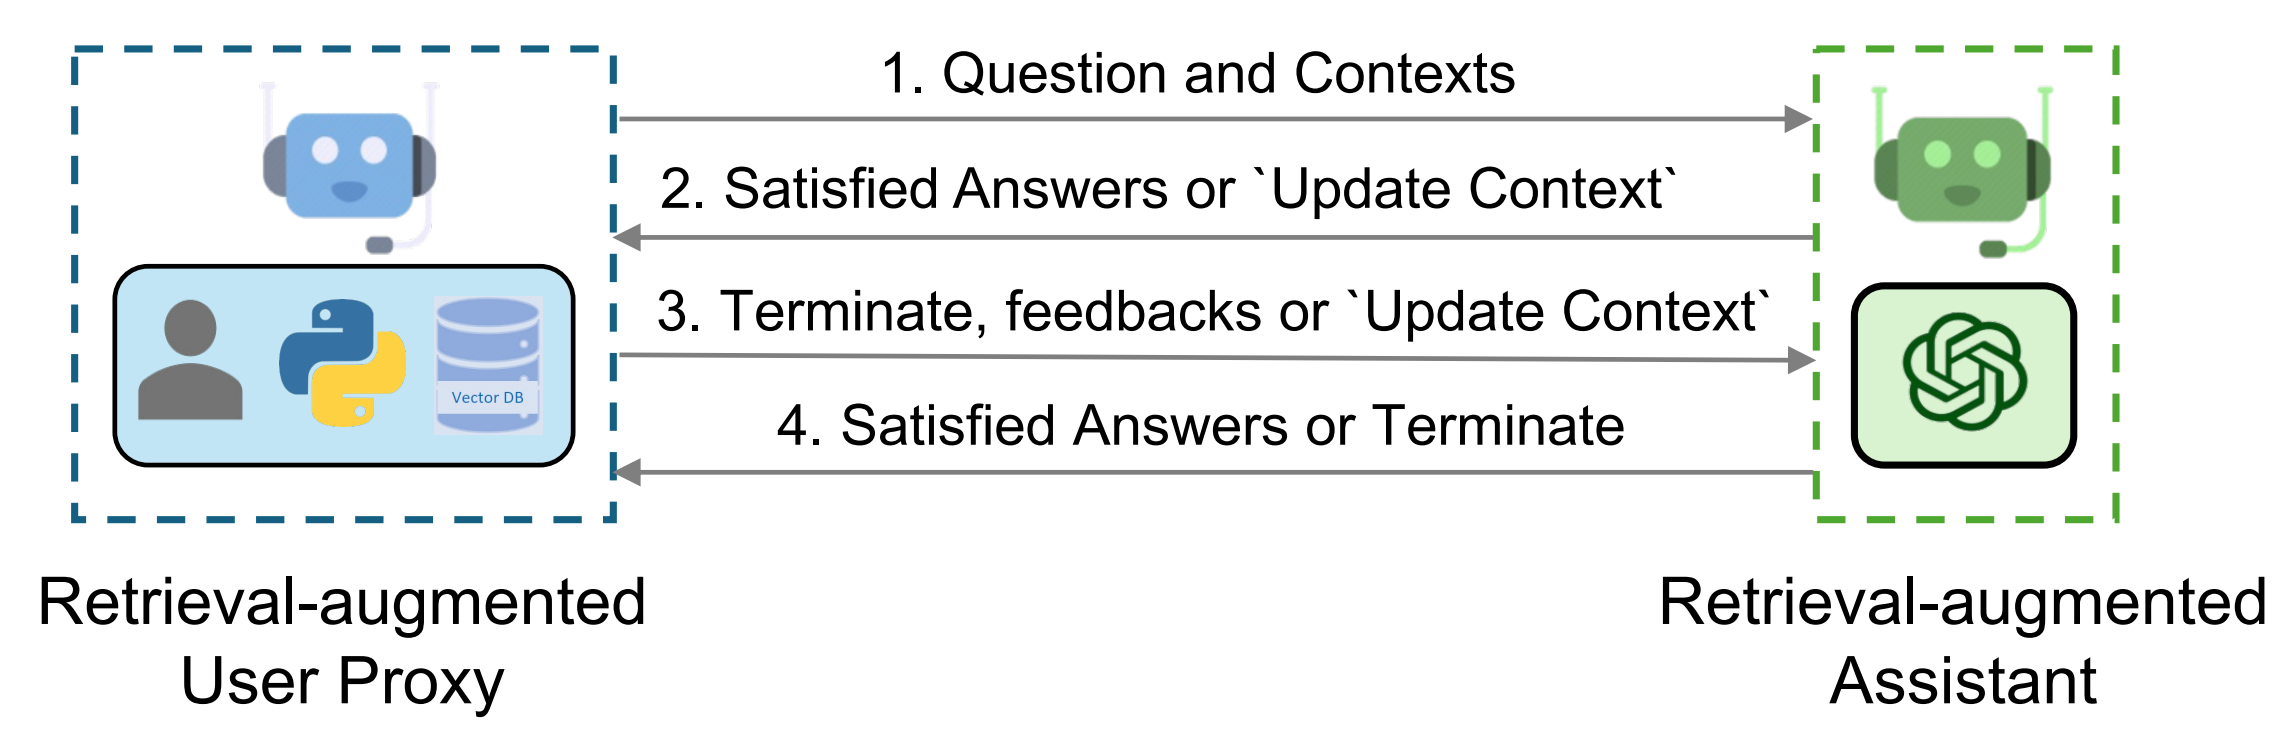
Source: Retrieval-Augmented Generation (RAG) Applications with AutoGen
Configuring RetrieveUserProxyAgent with Custom Text Splitting and OpenAI Embeddings for RAG
This code snippet demonstrates how to configure a RetrieveUserProxyAgent in AutoGen with a custom text splitter and an OpenAI-based embedding function for retrieval-augmented generation (RAG). It utilizes RecursiveCharacterTextSplitter to break documents into structured chunks for better embedding and retrieval.
The embedding function is set up using OpenAI's text-embedding-3-small model, but users can alternatively use the default SentenceTransformers embedding model. The RetrieveUserProxyAgent is then initialized with a predefined task, auto-reply constraints, and a document retrieval path, enabling it to fetch relevant context dynamically and generate accurate responses in an automated workflow.
from chromadb.utils import embedding_functions
from langchain.text_splitter import RecursiveCharacterTextSplitter

# Initialize a recursive character text splitter with specified separators
recur_spliter = RecursiveCharacterTextSplitter(separators=["\n", "\r", "\t"])

# Option 1: Using OpenAI Embeddings
openai_ef = embedding_functions.OpenAIEmbeddingFunction(
    api_key=os.environ["OPENAI_API_KEY"],
    model_name="text-embedding-3-small",
)

ragproxyagent = RetrieveUserProxyAgent(
    name="ragproxyagent",
    human_input_mode="NEVER",
    max_consecutive_auto_reply=2,
    retrieve_config={
        "task": "code",
        "docs_path": docs_file_paths,
        "chunk_token_size": 1200,  # Defines chunk size for document splitting
        "model": config_list[0]["model"],
        "vector_db": "couchbase",  # Using Couchbase Capella VectorDB
        "collection_name": os.environ["CB_COLLECTION"] ,  # Collection name in Couchbase
        "db_config": {
            "connection_string": os.environ["CB_CONN_STR"],  # Connection string for Couchbase
            "username": os.environ["CB_USERNAME"],  # Couchbase username
            "password": os.environ["CB_PASSWORD"],  # Couchbase password
            "bucket_name": os.environ["CB_BUCKET"],  # Bucket name in Couchbase
            "scope_name": os.environ["CB_SCOPE"],  # Scope name in Couchbase
            "index_name": os.environ["CB_INDEX_NAME"],  # Index name in Couchbase
        },
        "get_or_create": True,  # Set to False to avoid reusing an existing collection
        "overwrite": False,  # Set to True to overwrite an existing collection (forces index recreation)

        # Option 1: Use OpenAI embedding function (Uncomment below to enable)
        # "embedding_function": openai_ef,

        # Option 2: Default embedding model (SentenceTransformers 'all-mpnet-base-v2')
        "embedding_model": "all-mpnet-base-v2",  # Default model if OpenAI embeddings are not used

        # Custom text splitter function
        "custom_text_split_function": recur_spliter.split_text,
    },
    code_execution_config=False,  # Set to True if you want to execute retrieved code
)
Chat Interaction
This section marks the beginning of the chat interaction using RetrieveChat powered by Couchbase Capella for Retrieve Augmented Code Generation and Question Answering in AG2.
Example 1
Use RetrieveChat to help generate sample code and automatically run the code and fix errors if there is any.
Problem: How to use RetrieveChat Powered by Couchbase Capella for Retrieve Augmented Code Generation and Question Answering in AG2?
Note: You may need to create an index on the cluster to query
assistant.reset()
code_problem = "How to use RetrieveChat Powered by Couchbase Capella for Retrieve Augmented Code Generation and Question Answering in AG2?"
chat_result = ragproxyagent.initiate_chat(assistant, message=ragproxyagent.message_generator, problem=code_problem)
Expected Output
The notebook which explains how to use Couchbase with AG2 contains this code snippet. And so, the RAG Agent should return some code snippet similiar to this.
ragproxyagent = RetrieveUserProxyAgent(
    name="ragproxyagent",
    human_input_mode="NEVER",
    max_consecutive_auto_reply=3,
    retrieve_config={
        "task": "code",
        "docs_path": [
            "https://raw.githubusercontent.com/microsoft/FLAML/main/website/docs/Examples/Integrate%20-%20Spark.md",
            "https://raw.githubusercontent.com/microsoft/FLAML/main/website/docs/Research.md",
        ],
        "chunk_token_size": 2000,
        "model": config_list[0]["model"],
        "vector_db": "couchbase",  # Couchbase Capella VectorDB
        "collection_name": "demo_collection",  # Couchbase Capella collection name to be utilized/created
        "db_config": {
            "connection_string": os.environ["CB_CONN_STR"],  # Couchbase Capella connection string
            "username": os.environ["CB_USERNAME"],  # Couchbase Capella username
            "password": os.environ["CB_PASSWORD"],  # Couchbase Capella password
            "bucket_name": "test_db",  # Couchbase Capella bucket name
            "scope_name": "test_scope",  # Couchbase Capella scope name
            "index_name": "vector_index",  # Couchbase Capella index name to be created
        },
        "get_or_create": True,  # set to False if you don't want to reuse an existing collection
        "overwrite": False,  # set to True if you want to overwrite an existing collection, each overwrite will force a index creation and reupload of documents
    },
    code_execution_config=False,  # set to False if you don't want to execute the code
)